What Is Porchetta?
Porchetta is a deliciously moist, boneless, fatty pork roast marinated with plenty of garlic, salt, pepper, and some combination of aromatic herbs (e.g., rosemary), and sometimes fennel. It can be served hot, but you often see it cold sliced up for sandwiches. You may be more familiar with the flavor profile of porchetta via “Italian roast pork” sandwiches.Our Version
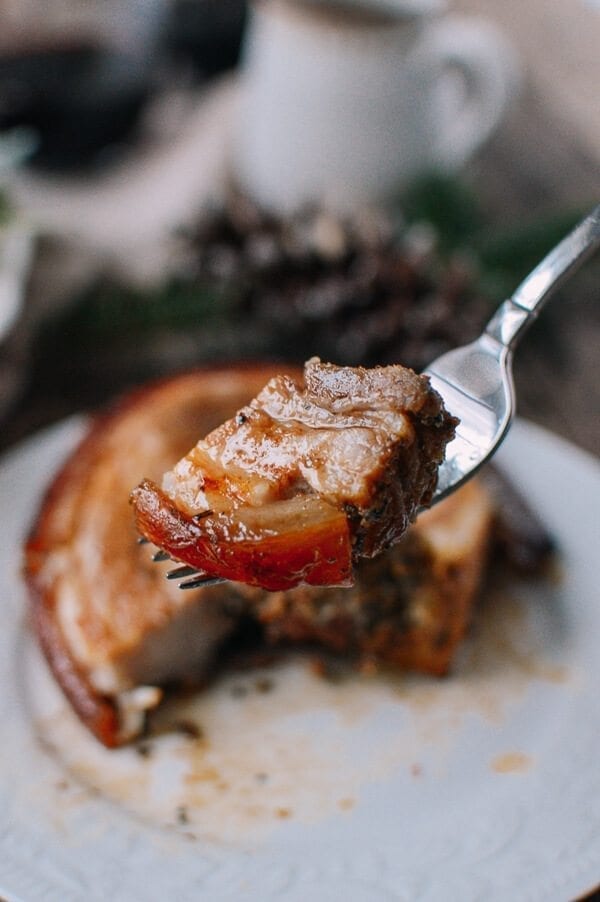
Our version of Porchetta has lots of toasted fennel, garlic, sage, and rosemary, and is made with rolled up pork belly. The pork belly skin gets scored and poked to make sure that you get a juicy interior to the roast with plenty of crispy skin. Porchetta can be slow roasted, but we’ve created a recipe that achieves all that flavor and crispy skin in 2½ hours. Enjoy this alternative holiday roast!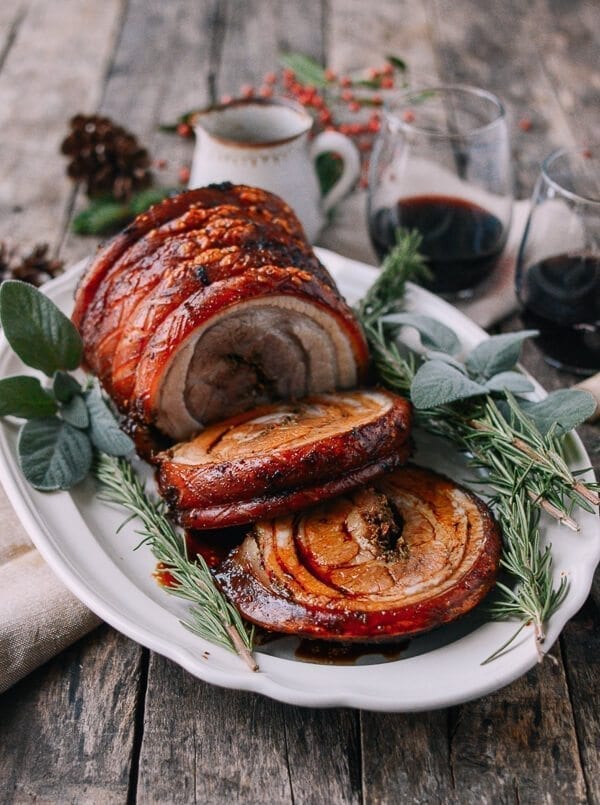
Porchetta Recipe Instructions
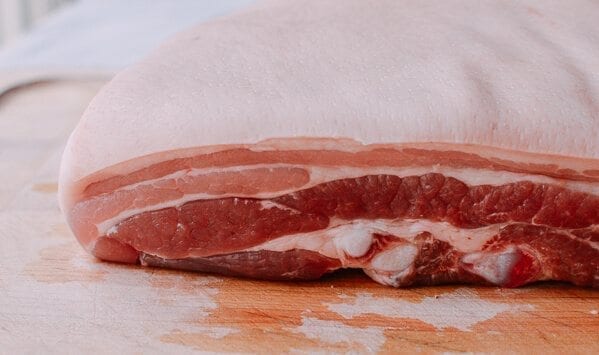
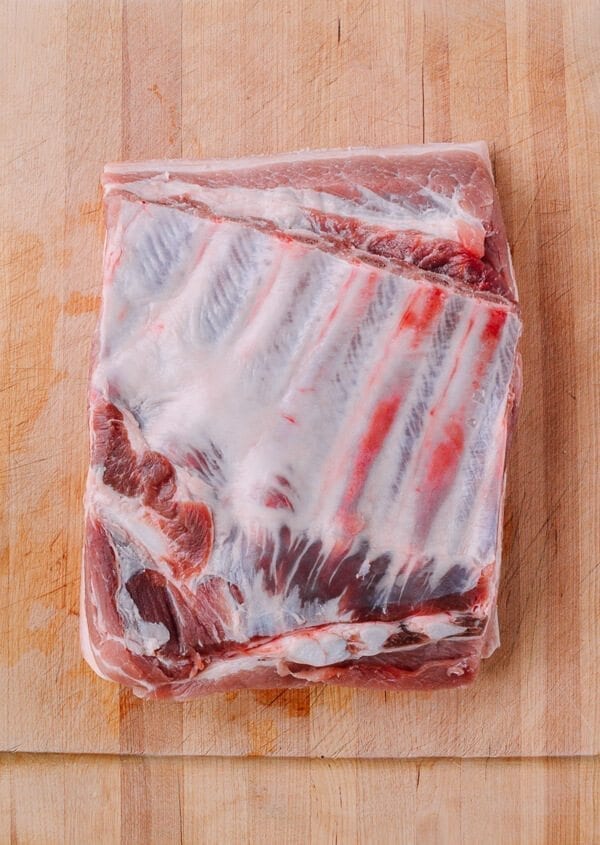
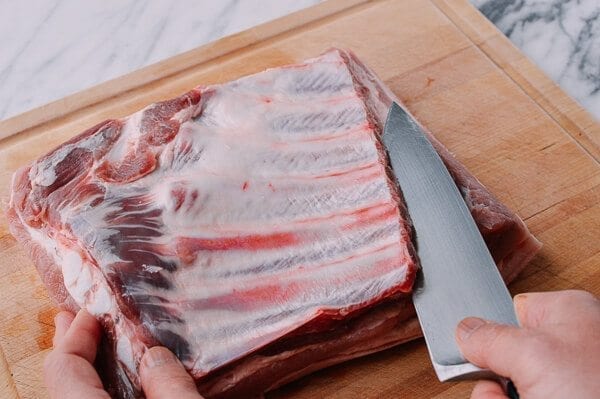
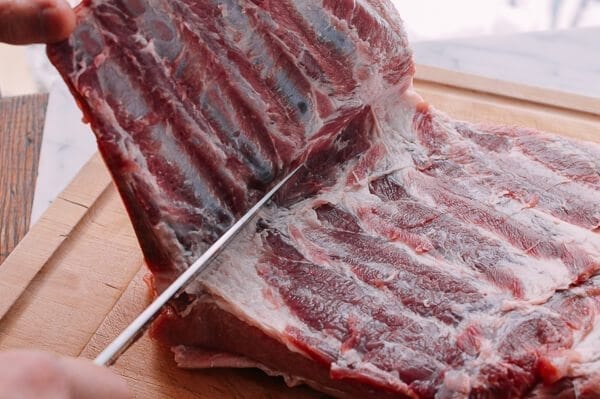
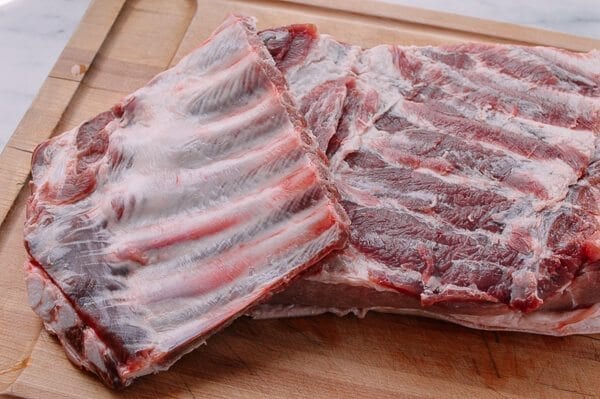
 Prepare the pork belly. You can ask your butcher for a boneless pork belly, but if all that’s available to you is the bone-in cut, you can also remove the rib bones yourself like so:
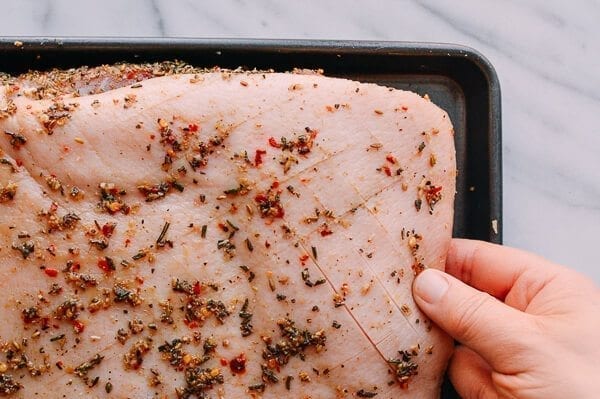
 Score the skin lightly in a diagonal checkerboard pattern, allowing for 1 inch between score lines. Take care not to cut through the skin entirely to the fat layer. The idea is to score it just enough that the skin splits while roasting for maximum crispiness and crackling!
Next, turn the pork belly skin side down, and use a two pronged roasting fork or a metal kebab skewer to poke 1 inch deep holes on the underside of the belly about 1 inch apart.
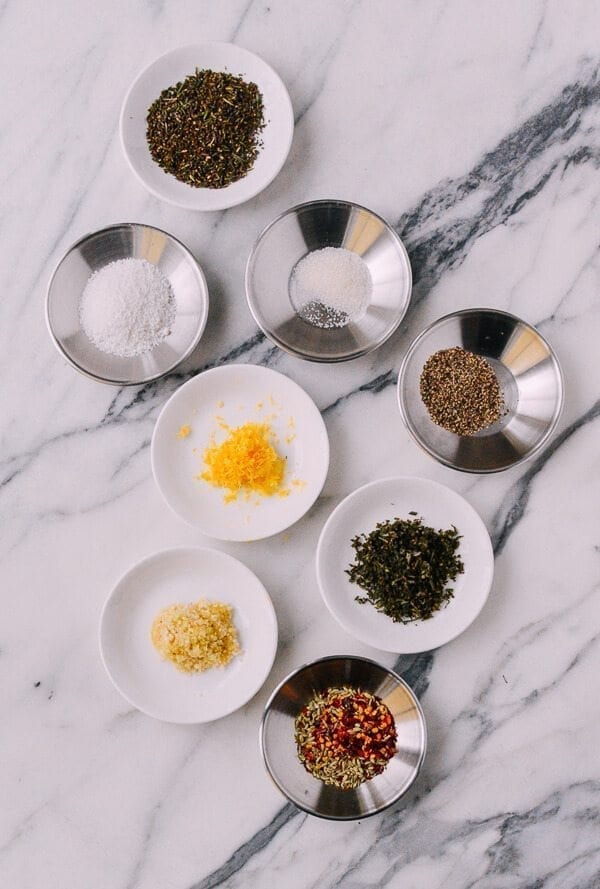
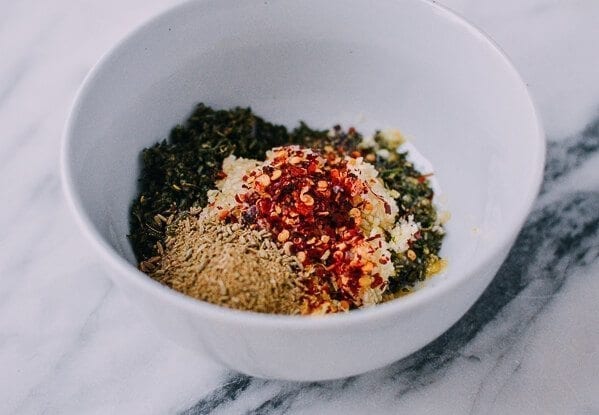
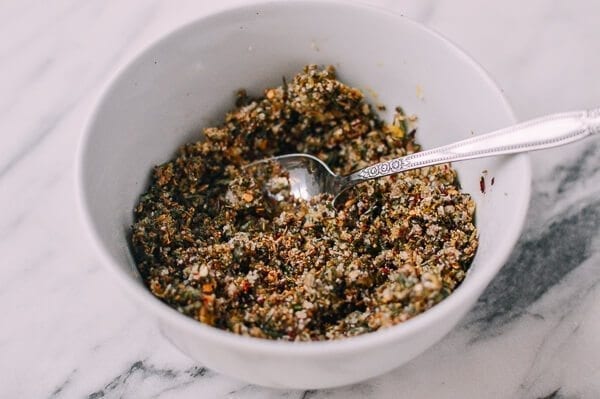
Prepare the marinade paste by mixing the ground toasted fennel seeds, sage, rosemary, crushed red pepper flakes, garlic, salt, sugar, black pepper, lemon zest, and olive oil.
Score the skin lightly in a diagonal checkerboard pattern, allowing for 1 inch between score lines. Take care not to cut through the skin entirely to the fat layer. The idea is to score it just enough that the skin splits while roasting for maximum crispiness and crackling!
Next, turn the pork belly skin side down, and use a two pronged roasting fork or a metal kebab skewer to poke 1 inch deep holes on the underside of the belly about 1 inch apart.
Prepare the marinade paste by mixing the ground toasted fennel seeds, sage, rosemary, crushed red pepper flakes, garlic, salt, sugar, black pepper, lemon zest, and olive oil.
 A quick tip is to lightly toast your own fennel seeds in a dry pan for an incredible burst of flavor. They toast very quickly over medium heat, so be careful not to burn them.
Rub the marinade all over the pork belly, including the sides and the skin. Place the marinated pork belly skin-side up on a sheet pan, cover in plastic wrap, and place in the refrigerator overnight. 12 hours of marinating time is ideal.
A quick tip is to lightly toast your own fennel seeds in a dry pan for an incredible burst of flavor. They toast very quickly over medium heat, so be careful not to burn them.
Rub the marinade all over the pork belly, including the sides and the skin. Place the marinated pork belly skin-side up on a sheet pan, cover in plastic wrap, and place in the refrigerator overnight. 12 hours of marinating time is ideal.
 The next day, take the marinated pork belly out of the refrigerator and let it sit out at room temperature for about 2 hours. When it’s at room temperature, position a rack in the lower third of the oven and preheat to 475 degrees F.
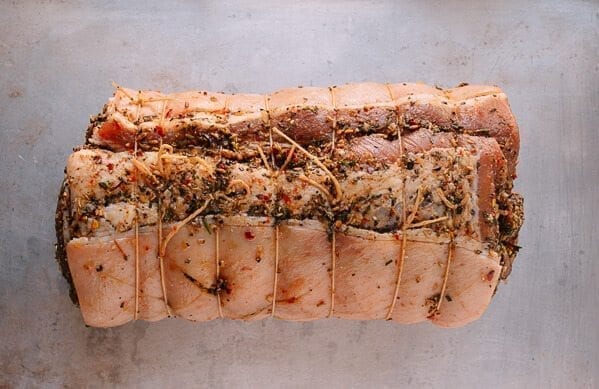
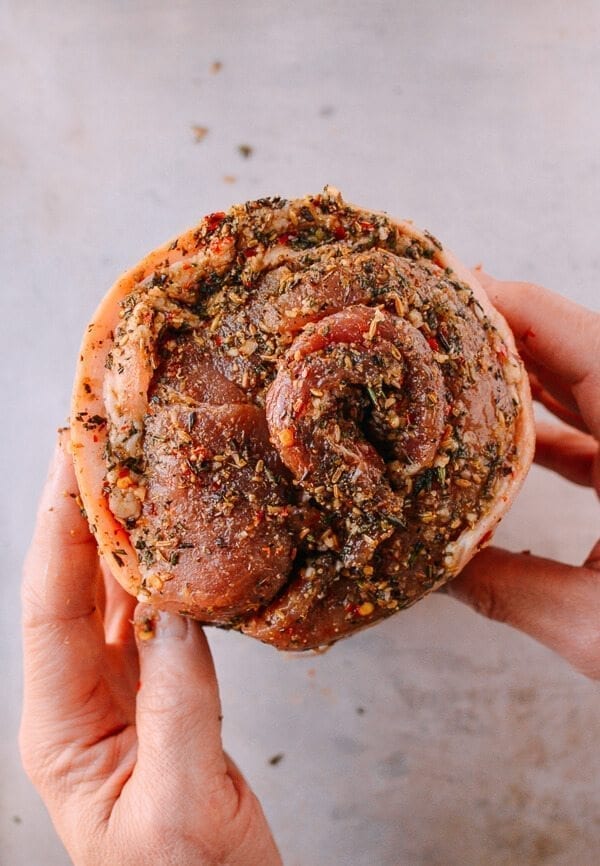
Now you’re ready to roll your pork belly into that signature porchetta shape. Put the pork belly skin side down. Roll the pork belly from the uncut side until it reaches the other side of the pork belly. Due to the thickness of the cut, it’s more like a fold than rolling. Have your butcher string handy, and tie the roast with string around the roast tightly several times, about 1-inch apart.
The next day, take the marinated pork belly out of the refrigerator and let it sit out at room temperature for about 2 hours. When it’s at room temperature, position a rack in the lower third of the oven and preheat to 475 degrees F.
Now you’re ready to roll your pork belly into that signature porchetta shape. Put the pork belly skin side down. Roll the pork belly from the uncut side until it reaches the other side of the pork belly. Due to the thickness of the cut, it’s more like a fold than rolling. Have your butcher string handy, and tie the roast with string around the roast tightly several times, about 1-inch apart.
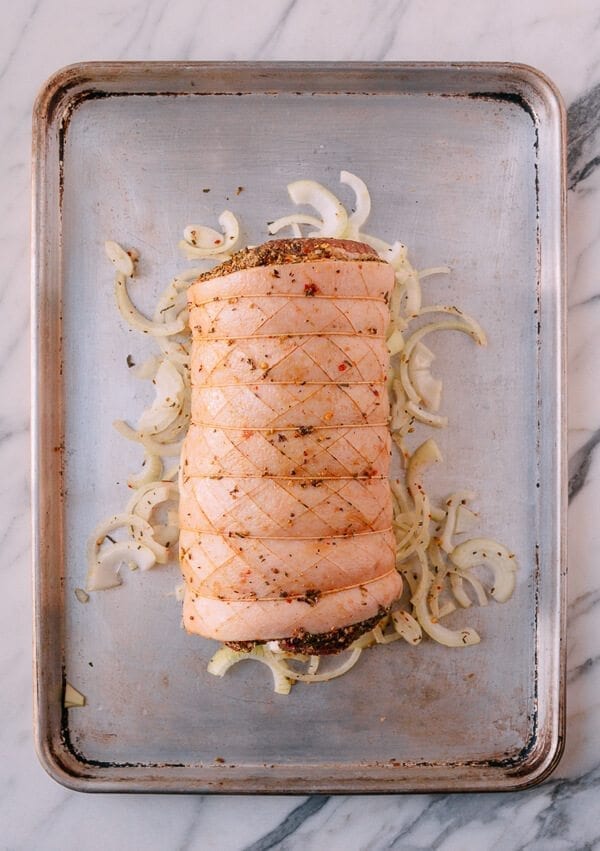
 Spread the sliced onion on a sheet pan…
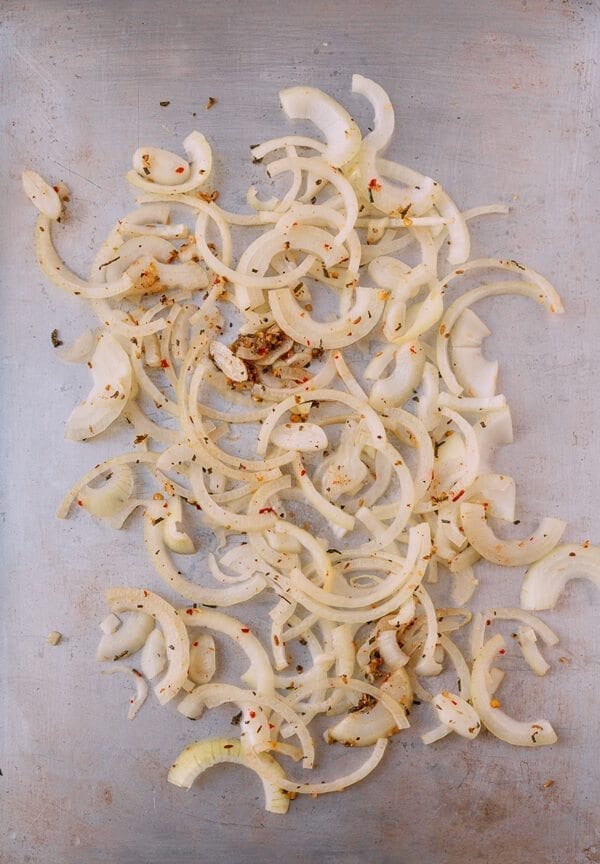 And add just enough water to cover the surface of the entire sheet pan. Place the roast on top. If there are still lots of herbs and spices on top of the pork roast, brush them off the skin and place them on the sides, otherwise they will burn.
 Put the roast in the oven for 15 minutes at 475 degrees F. Rotate the roasting pan 180 degrees, and then roast for another 15 minutes. Reduce the heat to 325F, and continue roasting for 2 hours.
Check the pan every 20 minutes, adding enough water to keep the pan juices from burning. It is important not to let the pan drippings burn, since you will be serving your porchetta with it. You’ve come this far–commit!!!
You can use a meat thermometer to ensure the meat has reached at least 150F, but if you follow these roasting temperatures and times, your roast will surely be done. We did not use a meat thermometer for this roast, and it came out great and not at all dry.
After a total of 2½ hours in the oven, the skin of your porchetta should be a slightly dark golden brown, and you should be able to see the diagonal scores. At this stage, the skin may look crisp, but if it is still smooth, it will likely still be a bit tough and leathery. So, to make the porchetta skin cracklin’ and crispy, turn the oven temperature back up to 450F.
Roast the porchetta for another 10 to 15 minutes once the oven reaches 450F, and check it every 5 minutes, or until you see the skin bubble up. The skin on top of the roast will bubble up first, and, when this happens, place a long but narrow piece of foil on top of the roast lengthwise to cover the top end-to-end, leaving the sides of the roast exposed to the high heat. Keep roasting until the skin on both sides get more of that bubbly crackling look.
Use your own judgment on how much you want to crisp up the skin. The general the rule of thumb is that if the skin is bubbled up, it will be crispy, and if it is somewhat smooth, then the skin will still be a bit tough and leathery. Once you’re satisfied, take the roast out of the oven and let it rest for 15 minutes.
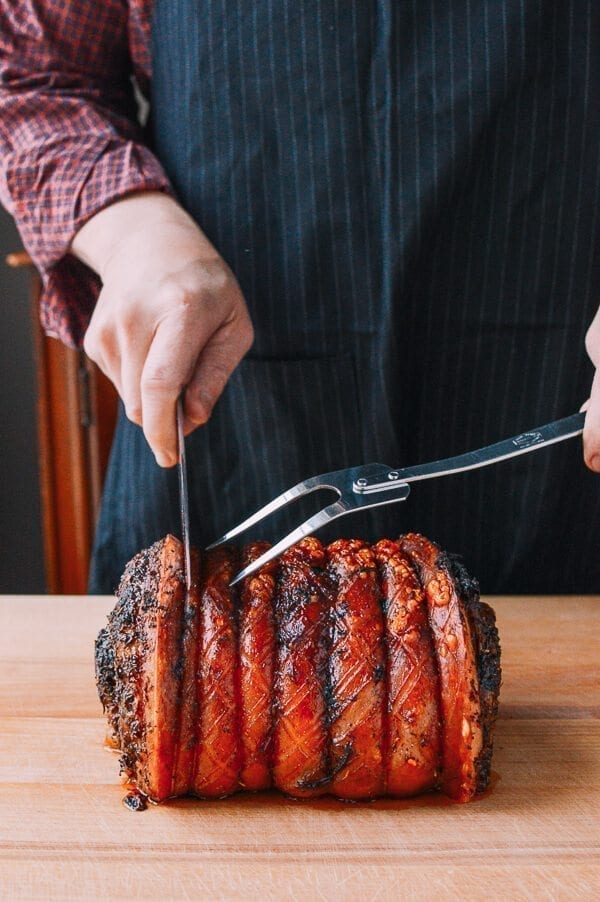
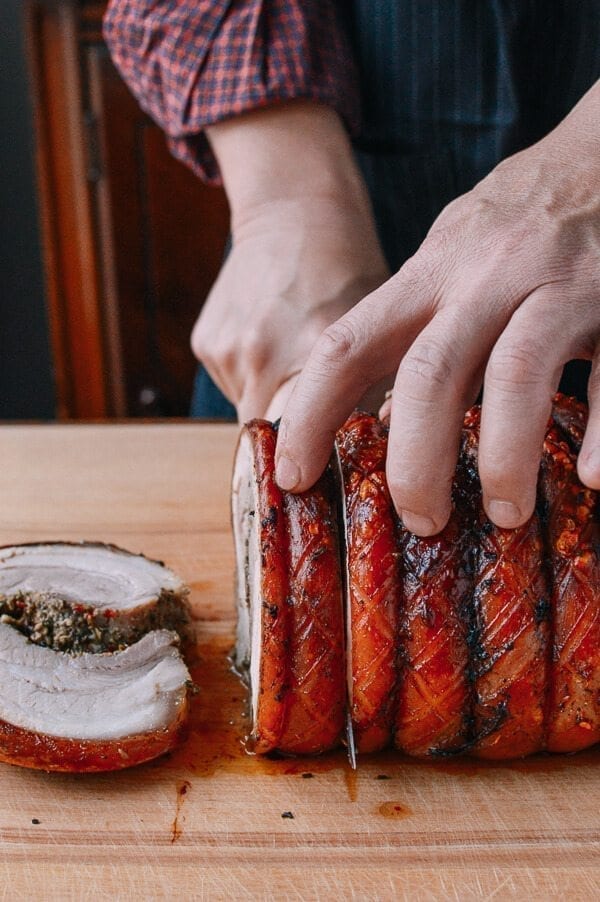
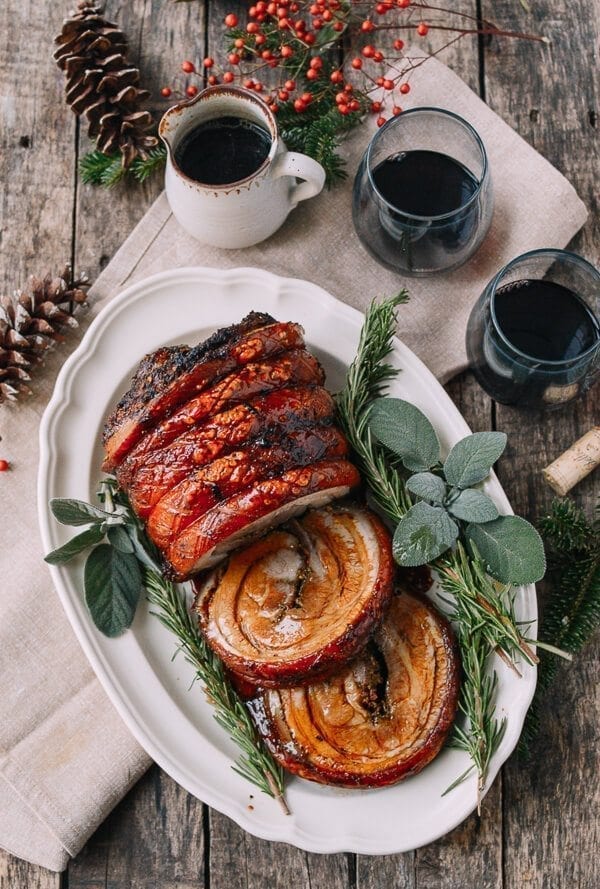
After the roast has rested, cut and remove the butcher’s string carefully, as it will be stuck to the skin. Transfer the roast to a serving plate, and cut the roast where the string was tied to get perfectly portioned 1½-inch thick slices.
Put the roast in the oven for 15 minutes at 475 degrees F. Rotate the roasting pan 180 degrees, and then roast for another 15 minutes. Reduce the heat to 325F, and continue roasting for 2 hours.
Check the pan every 20 minutes, adding enough water to keep the pan juices from burning. It is important not to let the pan drippings burn, since you will be serving your porchetta with it. You’ve come this far–commit!!!
You can use a meat thermometer to ensure the meat has reached at least 150F, but if you follow these roasting temperatures and times, your roast will surely be done. We did not use a meat thermometer for this roast, and it came out great and not at all dry.
After a total of 2½ hours in the oven, the skin of your porchetta should be a slightly dark golden brown, and you should be able to see the diagonal scores. At this stage, the skin may look crisp, but if it is still smooth, it will likely still be a bit tough and leathery. So, to make the porchetta skin cracklin’ and crispy, turn the oven temperature back up to 450F.
Roast the porchetta for another 10 to 15 minutes once the oven reaches 450F, and check it every 5 minutes, or until you see the skin bubble up. The skin on top of the roast will bubble up first, and, when this happens, place a long but narrow piece of foil on top of the roast lengthwise to cover the top end-to-end, leaving the sides of the roast exposed to the high heat. Keep roasting until the skin on both sides get more of that bubbly crackling look.
Use your own judgment on how much you want to crisp up the skin. The general the rule of thumb is that if the skin is bubbled up, it will be crispy, and if it is somewhat smooth, then the skin will still be a bit tough and leathery. Once you’re satisfied, take the roast out of the oven and let it rest for 15 minutes.
After the roast has rested, cut and remove the butcher’s string carefully, as it will be stuck to the skin. Transfer the roast to a serving plate, and cut the roast where the string was tied to get perfectly portioned 1½-inch thick slices.
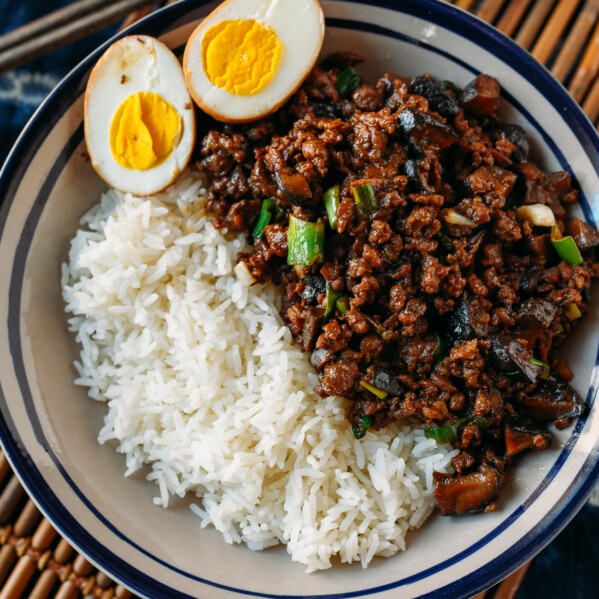
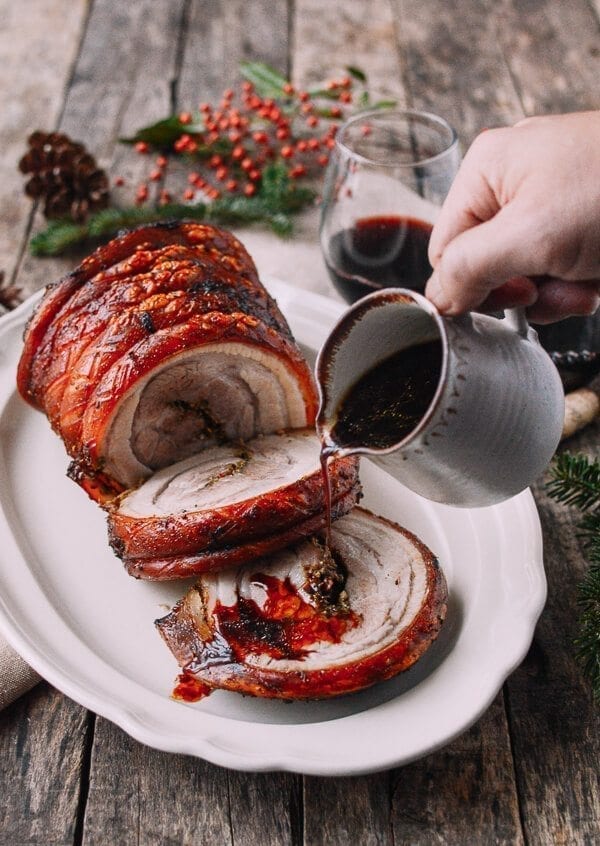
 Pour the pan juices through a strainer into a gravy separator. If you want more pan juices, pour hot water on the pan to deglaze it first. Pour the juices into a bowl or small gravy pitcher and serve on the side, along with mashed potatoes, or, of course, plain white rice! This is The Woks of Life after all…
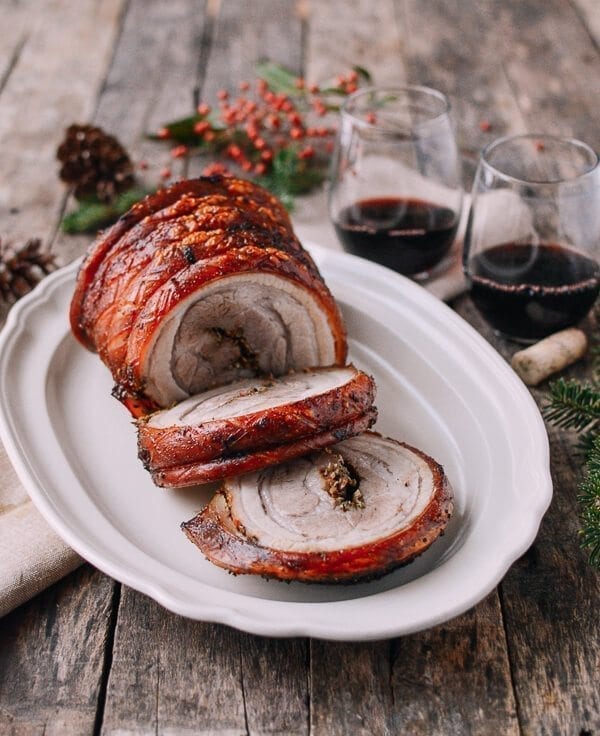 Save porchetta roast leftovers to make sandwiches for lunch–we recommend topping them with provolone, broccoli rabe and maybe some pepperoncinis. You’ll be the envy of everyone when you’re back from the holidays!
Recipe

Porchetta
An Italian specialty, porchetta is a tasty, herb-roasted pork belly with crisp, crackling skin. Porchetta is a deliciously moist, boneless, fatty pork roast marinated with plenty of garlic, salt, pepper, and aromatic herbs served hot, but you often see it cold sliced up for sandwiches
Serves: 12
Ingredients
- 5 to 6 pound fresh boneless lean pork belly (skin on)
- 1 tablespoon fennel seeds (toasted and coarsely ground)
- 1½ tablespoons minced fresh sage
- 1½ tablespoons minced fresh rosemary
- ½ teaspoon crushed red pepper flakes
- 4 cloves garlic (grated or finely minced)
- 1½ tablespoons sea salt or Kosher salt
- 1 teaspoon sugar
- 1 teaspoon freshly ground black pepper
- 1 tablespoon fresh lemon zest
- 2 tablespoons light olive oil
- 1 large onion (sliced)
Instructions
- Prepare the pork belly by first scoring the skin lightly in a diagonal checkerboard pattern, allowing for 1 inch between score lines. Take care not to cut through the skin entirely to the fat layer. The idea is to score it just enough that the skin splits while roasting for maximum crispiness and crackling!
- Next, turn the pork belly skin side down, and use a two pronged roasting fork or a metal kebab skewer to poke 1 inch deep holes on the underside of the belly about 1 inch apart.
- Prepare the marinade paste by mixing the ground fennel seeds, sage, rosemary, crushed red pepper flakes, garlic, salt, sugar, black pepper, lemon zest, and olive oil. A quick tip is to lightly toast your own fennel seeds in a dry pan for an incredible burst of flavor. They toast very quickly over medium heat, so be careful not to burn them.
- Rub the marinade all over the pork belly, including the sides and the skin. Place the marinated pork belly skin-side up on a sheet pan, cover in plastic wrap, and place in the refrigerator overnight. 12 hours of marinating time is ideal.
- The next day, take the marinated pork belly out of the refrigerator and let it sit out at room temperature for about 2 hours. When it’s at room temperature, position a rack in the lower third of the oven and preheat to 475 degrees F.
- Now you’re ready to roll your pork belly into that signature porchetta shape. Put the pork belly skin side down. Roll the pork belly from the uncut side until it reaches the other side of the pork belly. Due to the thickness of the cut, it’s more like a fold than rolling. Have your butcher string handy, and tie the roast with string around the roast tightly several times, about 1-inch apart.
- Spread the sliced onion on a sheet pan, and add just enough water to cover the surface of the entire sheet pan. Place the roast on top. If there are still lots of herbs and spices on top of the pork roast, brush them off the skin and place them on the sides, otherwise they will burn.
- Put the roast in the oven for 15 minutes at 475 degrees F. Rotate the roasting pan 180 degrees, and then roast for another 15 minutes. Reduce the heat to 325F, and continue roasting for 2 hours.
- Check the pan every 20 minutes, adding enough water to keep the pan juices from burning. It is important not to let the pan drippings burn, since you will be serving your porchetta with it.
- After a total of 2½ hours in the oven, the skin of your porchetta should be a slightly dark golden brown, and you should be able to see the diagonal scores. At this stage, the skin may look crisp, but if it is still smooth, it will likely still be a bit tough and leathery. So, to make the porchetta skin cracklin’ and crispy, turn the oven temperature back up to 450F.
- Roast the porchetta for another 10 to 15 minutes once the oven reaches 450F, and check it every 5 minutes, or until you see the skin bubble up. The skin on top of the roast will bubble up first, and, when this happens, place a long but narrow piece of foil on top of the roast lengthwise to cover the top end-to-end, leaving the sides of the roast exposed to the high heat. Keep roasting until the skin on both sides get more of that bubbly crackling look.
- Use your own judgment on how much you want to crisp up the skin. The general the rule of thumb is that if the skin is bubbled up, it will be crispy, and if it is somewhat smooth, then the skin will still be a bit tough and leathery. Once you’re satisfied, take the roast out of the oven and let it rest for 15 minutes.
- After the roast has rested, cut and remove the butcher’s string carefully, as it will be stuck to the skin. Transfer the roast to a serving plate, and cut the roast where the string was tied to get perfectly portioned 1½-inch thick slices.
- Pour the pan juices through a strainer into a gravy separator. If you want more pan juices, pour hot water on the pan to deglaze it first. Pour the juices into a bowl or small gravy pitcher and serve on the side.
Nutrition Facts
Calories: 781kcal (39%) Carbohydrates: 2g (1%) Protein: 18g (36%) Fat: 103g (158%) Saturated Fat: 37g (185%) Cholesterol: 136mg (45%) Sodium: 935mg (39%) Potassium: 379mg (11%) Fiber: 1g (4%) Sugar: 1g (1%) Vitamin A: 50IU (1%) Vitamin C: 2.3mg (3%) Calcium: 24mg (2%) Iron: 1.2mg (7%)