Secrets to Homemade Mooncakes
With Chinese pastries, I have to tell you, the key ingredient is always lard. Can’t find lard anywhere? You know we wouldn’t leave you hanging––rendering lard yourself using our recipe is easy. Plus, the recipe yields the perfect amount of lard for these Su-Style Mooncakes. A few days ago, we posted the recipe for our Sweet Red Bean Paste filling. The second element of the recipe is the mooncake crust, and it’s quite straightforward, if I do say so! Plus with the help of a rubber spatula, you don’t even have to get your hands dirty. But even so, I can’t sugarcoat it. Mooncakes require multiple steps and some planning. HOWEVER, after having made Shanghai Savory Mooncakes, Lotus Paste Mooncakes with Salted Egg Yolks, and Ham and Nut Mooncakes, I can still confidently say that I’ll never go back to buying them. Homemade mooncakes are SO much better. They’re cheaper to make, they’re tastier, and they don’t have any artificial preservatives.Recipe Tips Before We Start
- The Sweet Red Bean Paste filling can be made days ahead and stored in the refrigerator tightly covered/sealed.
- There are two kinds of dough for this recipe. Both can be made a day or two before and kept in the fridge until you’re ready to assemble. Lard in the dough hardens once chilled, so leave it at room temperature for 30 minutes before handling.
- Consider adding salted duck egg yolks if you like. Just follow our Lotus Paste Mooncakes with Salted Egg Yolks recipe for instructions on how to prep the egg yolks. Each yolk weighs about 22 grams, so you’ll need 40% less sweet red bean paste.
- Gentle hands are required to keep the crumbly crust intact!
- Since there are no preservatives, it’s best to store these mooncakes in an airtight container in the refrigerator for up to two weeks. I like them at room temperature, no reheating needed, but these are ideally eaten when they are fresh.
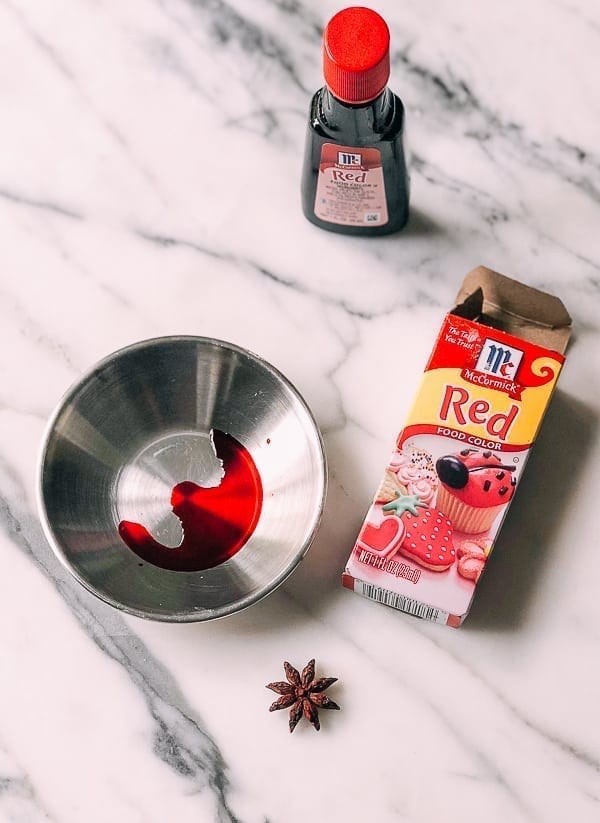
- With these Su-Style Mooncakes, I even took the extra step of making the distinctive red marking. I simply mixed 10 drops of red food coloring with ⅛ teaspoon water to create “ink” and used the back of a star anise pod as a stamp. Shake off the excess “ink” on the star anise before stamping the mooncake, or you will end up with a red puddle that has no visible outlines.
 Let’s get started!
Red Bean Mooncakes: Recipe Instructions
For the Sweet Red Bean Paste filling, see our previous post on how to make red bean paste in an Instant Pot. Each ball of bean paste is 55 grams, and the recipe makes about 20-22 pieces. If you don’t have an instant pot, make our stovetop red bean paste as outlined in our red bean bread post.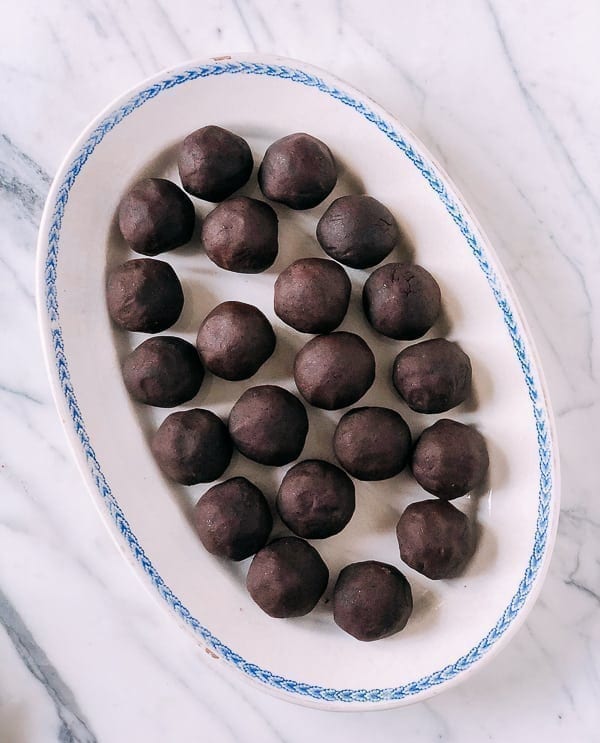
To make the mooncake soft dough
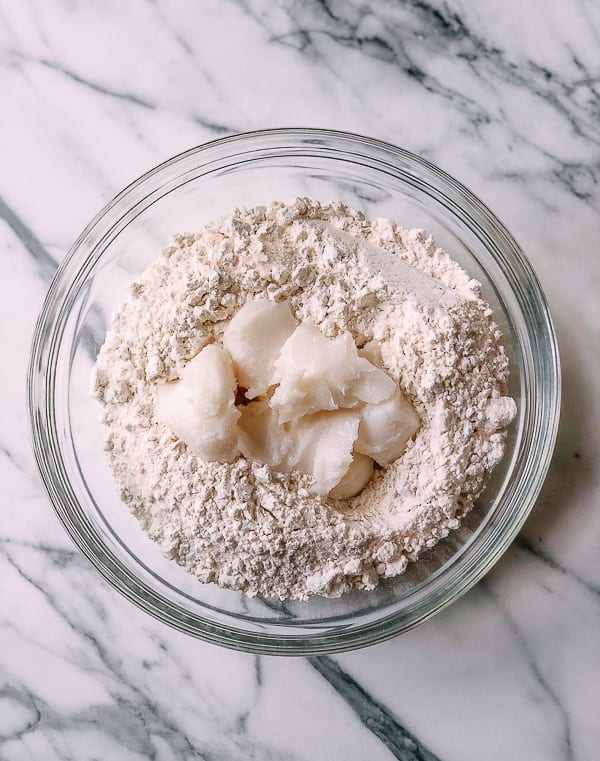
- 3 cups all-purpose flour (415 grams)
- 2 tablespoons sugar (20 grams)
- ¾ cup lard (160 grams)
- 1 cup lukewarm water (250 ml, about 140F /60C)
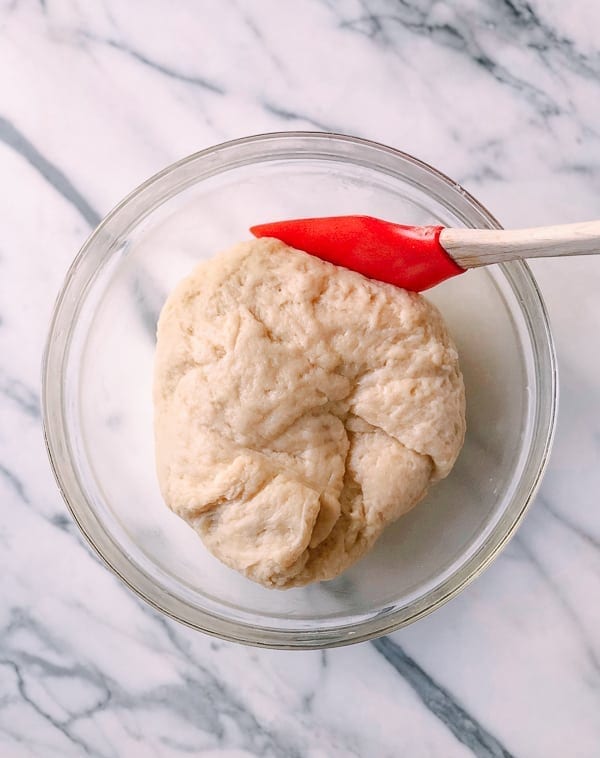
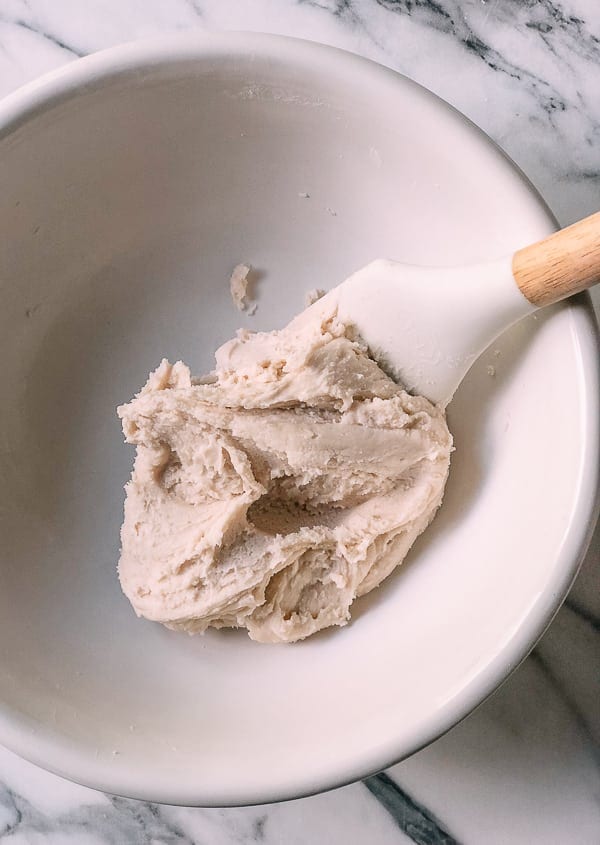
 Slowly add 1 cup of lukewarm water in 3-4 batches, mixing with a rubber spatula.
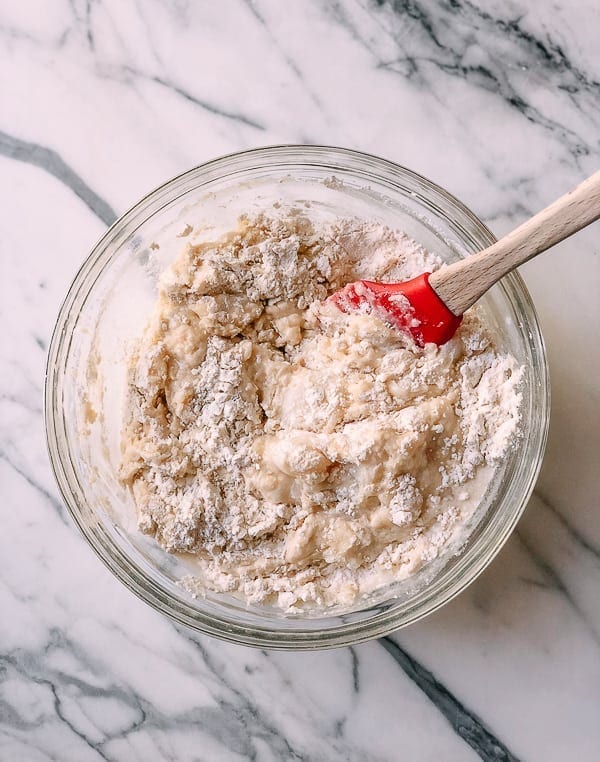 Keep folding the lard into the flour with a spatula to form a smooth dough ball. Cover with clear plastic wrap and let it rest in the refrigerator for 30 minutes.
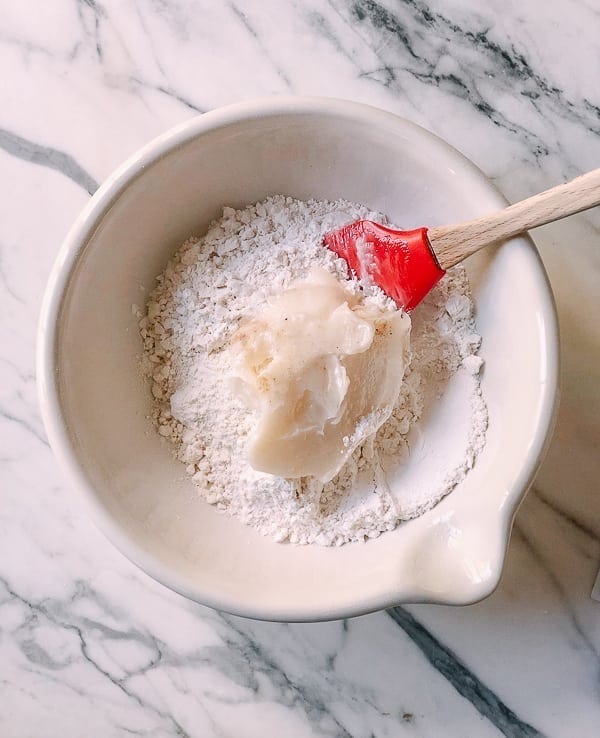
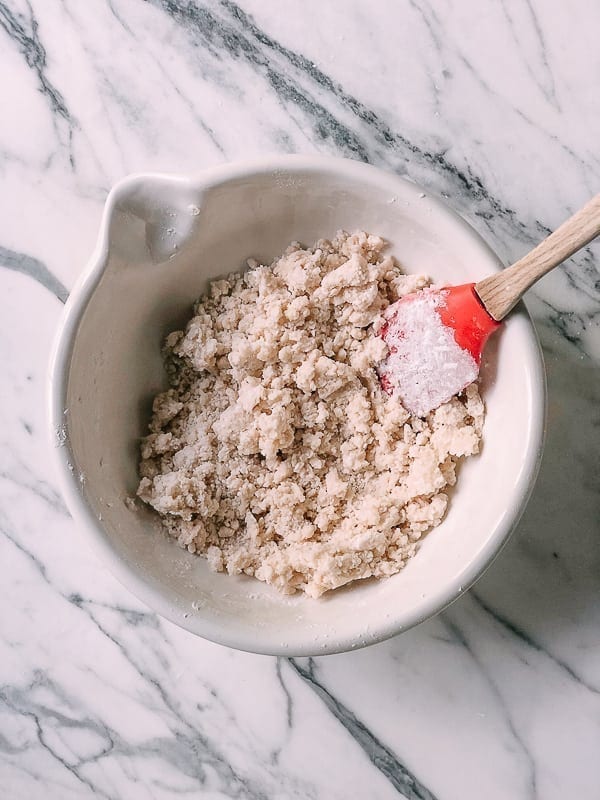
To make the mooncake pastry dough:
- 2 cups cake flour (265 grams)
- ⅔ cup lard (140 grams)
To assemble the red bean mooncakes:
After both kinds of dough have chilled for 30 minutes, take them out and weigh each ball. Take the total weight of both balls of dough (we’ll be combining them), and divide it by the number of balls of red bean paste filling that you have (you will have made these balls of filling when following the recipe for the filling). This will give you the amount of dough needed for each mooncake. I needed 55 grams of dough to make 1 mooncake. Now transfer the soft dough onto a clean and lightly-floured flat surface. Divide the soft dough as well as the pastry dough into two equal portions, and do the next step in two batches, especially if you don’t have a large surface. On a floured surface, press the soft dough into a large disc, and add the pastry dough in the middle.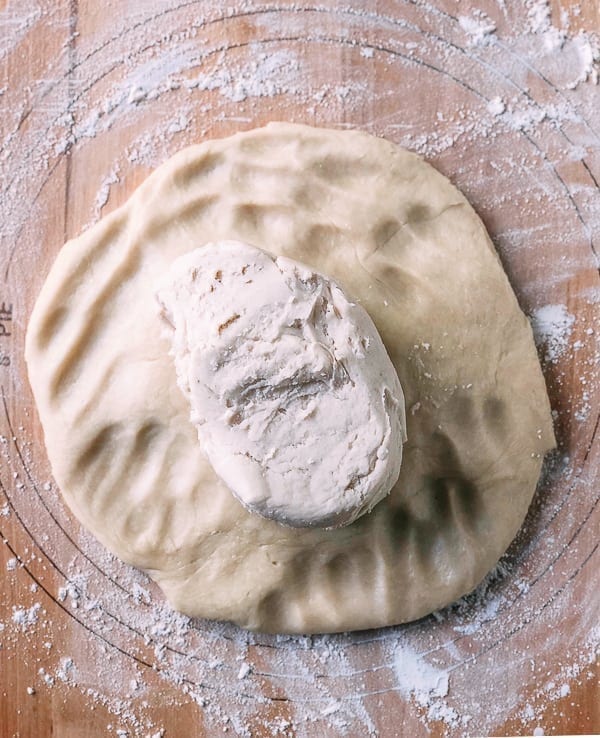 Close all sides to form a large ball. Remember to keep flouring the work surface as needed to prevent it from sticking.
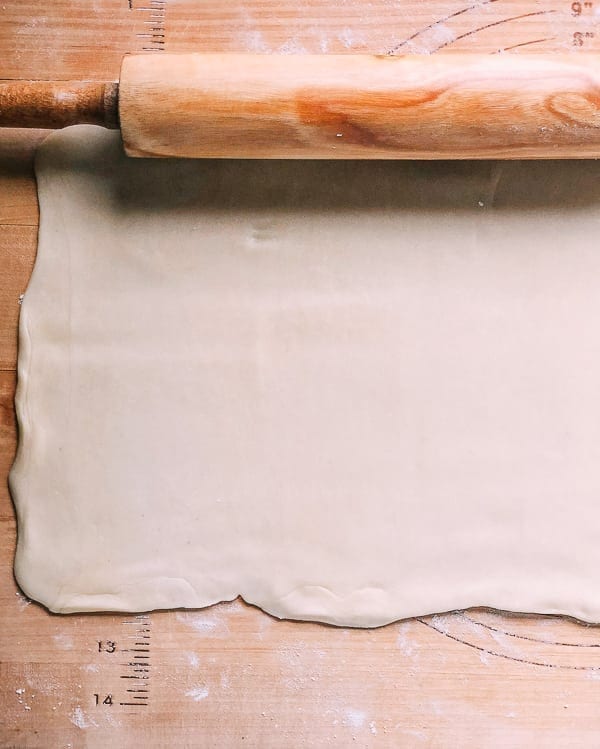
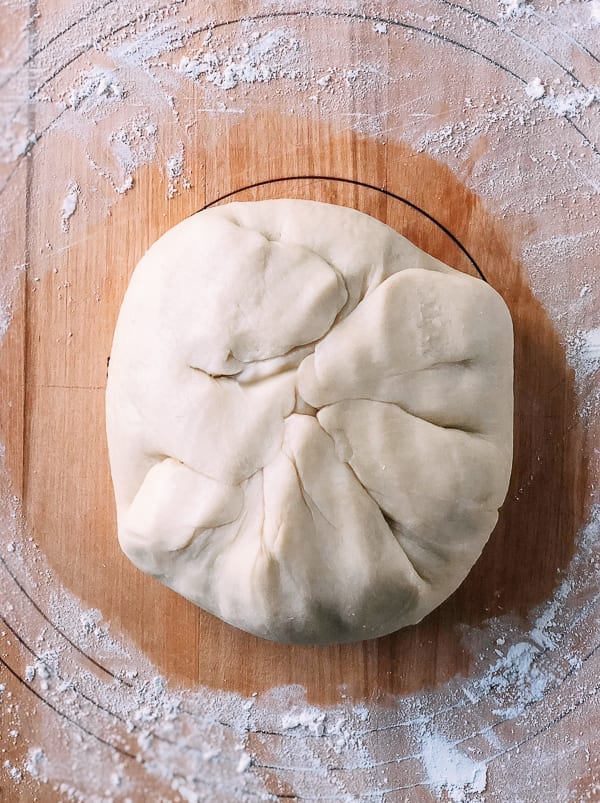 With a rolling pin, roll it into a rectangle shape about ¼-inch thick. Then fold the rectangle shape into a tri-fold.
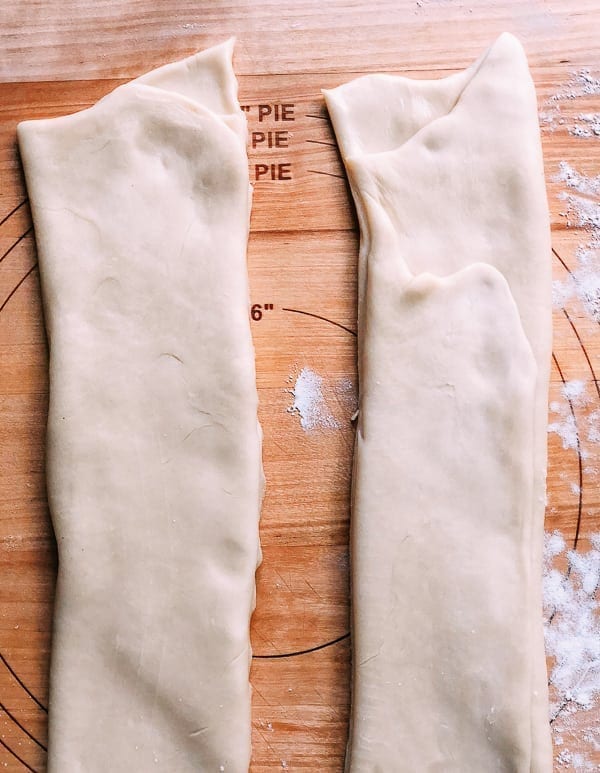 Roll it out again into a rectangle shape that’s about ⅛-inch thick.
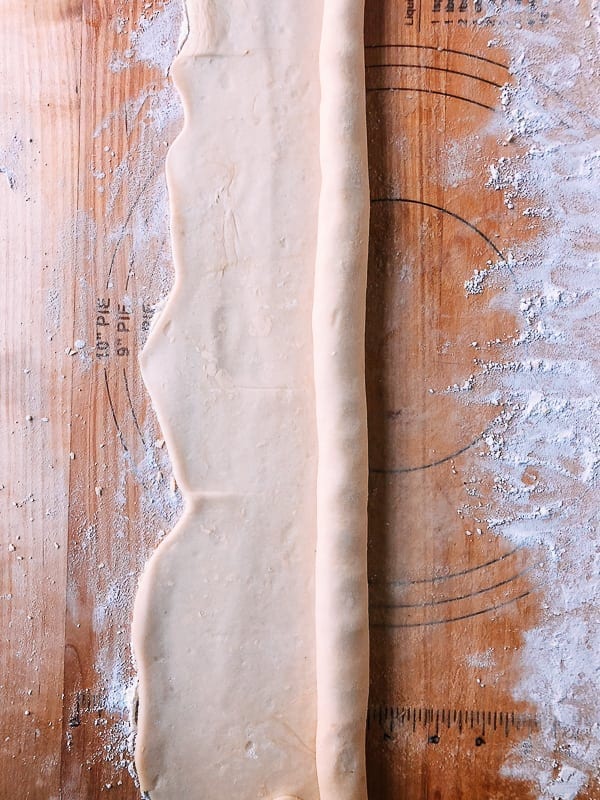
 Roll up the sheet on the long-side into a tube and do your best to roll it tight.
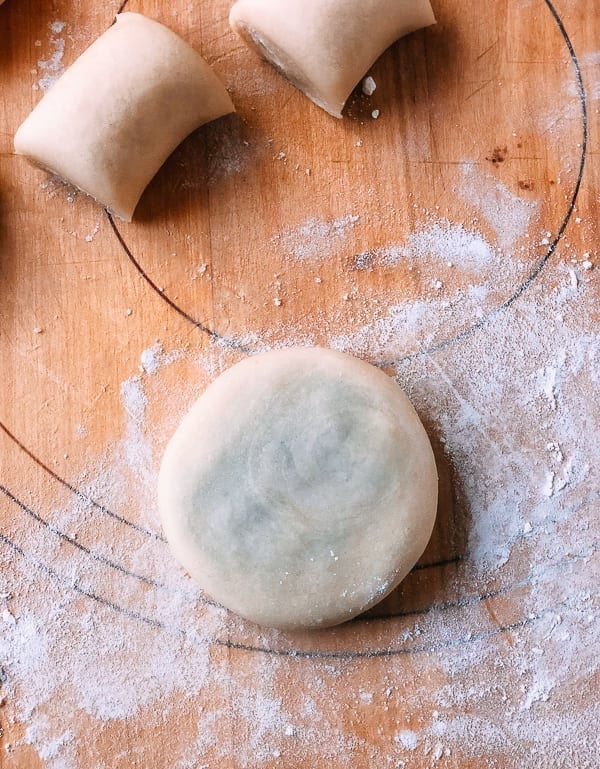
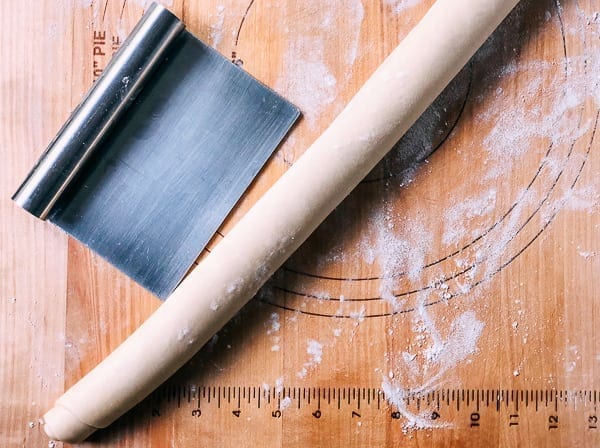 Now cut the tube into cylinders, each weighing as much as you calculated with the help of a kitchen scale.
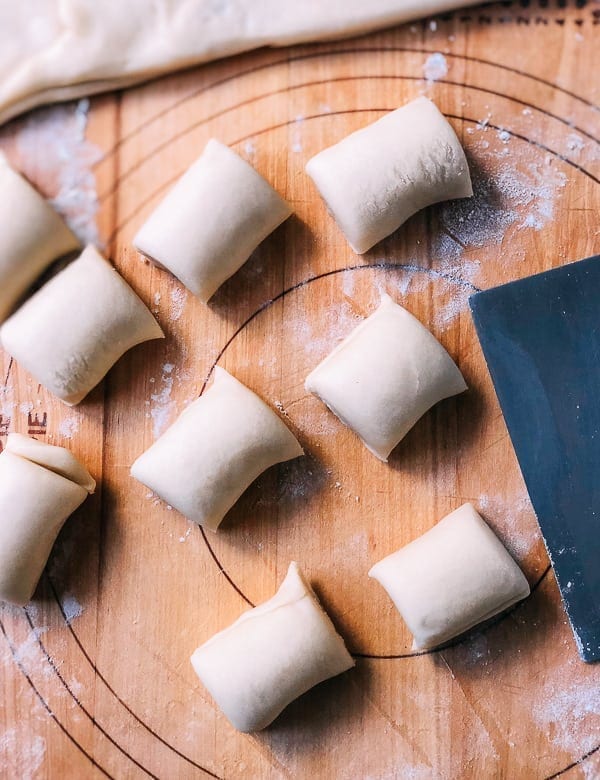 Now take one dough segment and stand it upright so that the swirls are facing up…
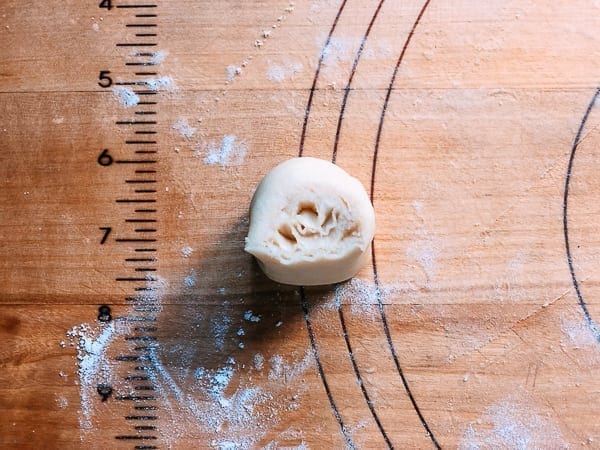 And press it flat.
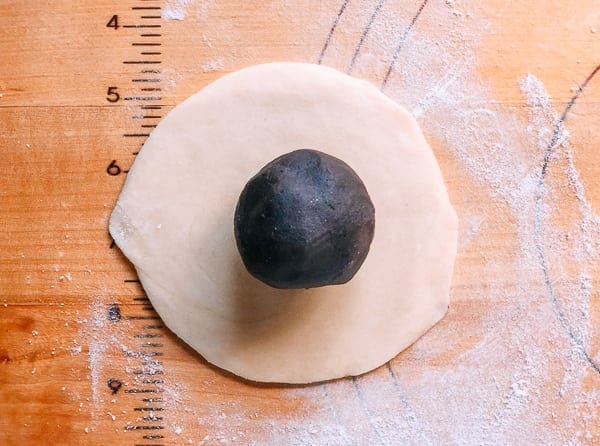
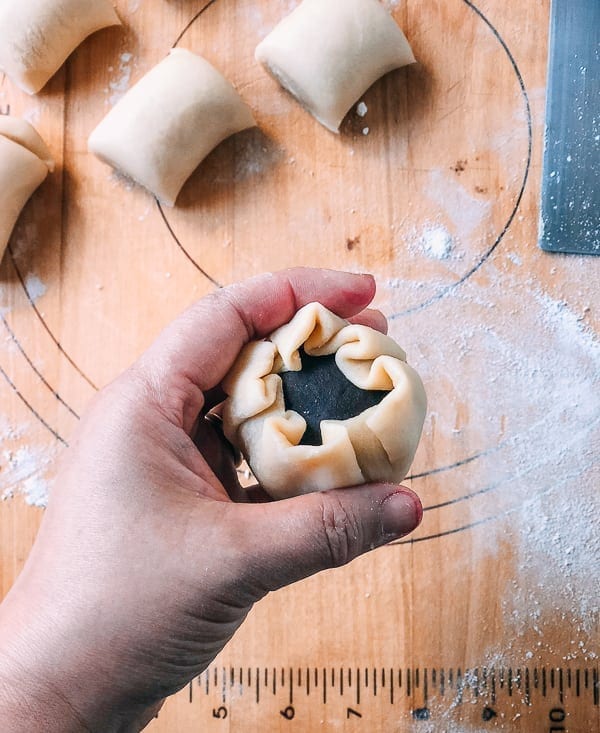
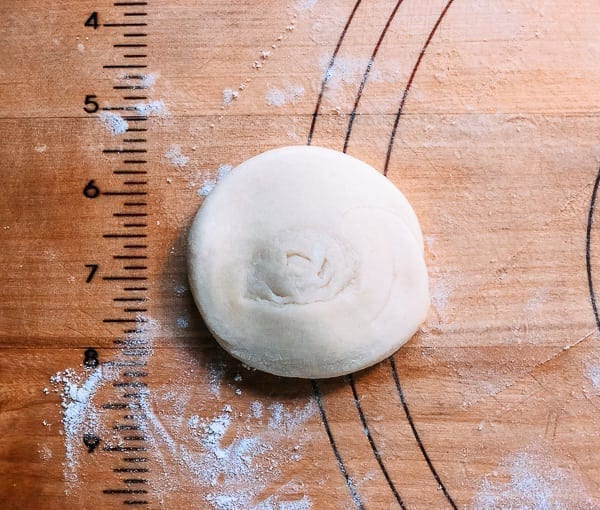 With a rolling pin, roll the dough into a 4-inch disc (it should be slightly thinner around the outer edges and thicker in the middle). Add a ball of sweet red bean paste filling in the center.
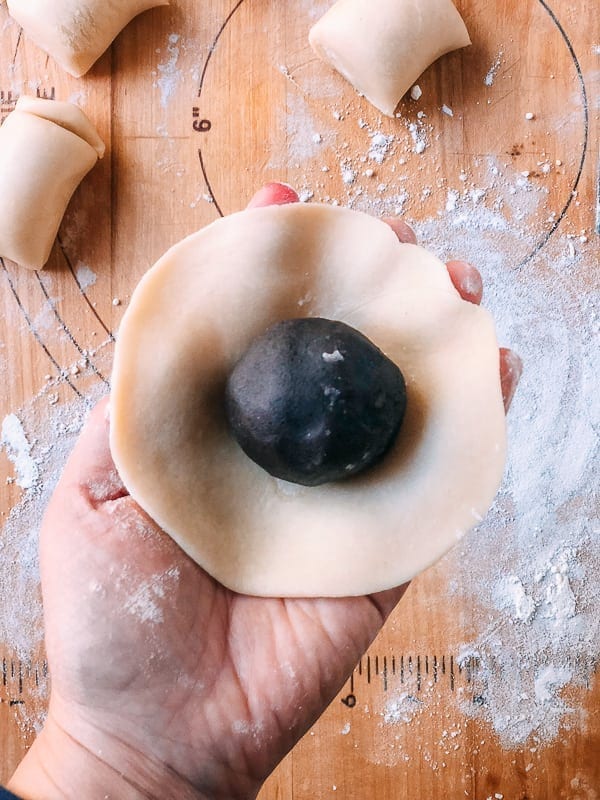
 Close all the sides until it’s sealed tight and no filling is visible.
 Put the seam side down, gently flattening the ball into a round disc that’s 1-inch thick.
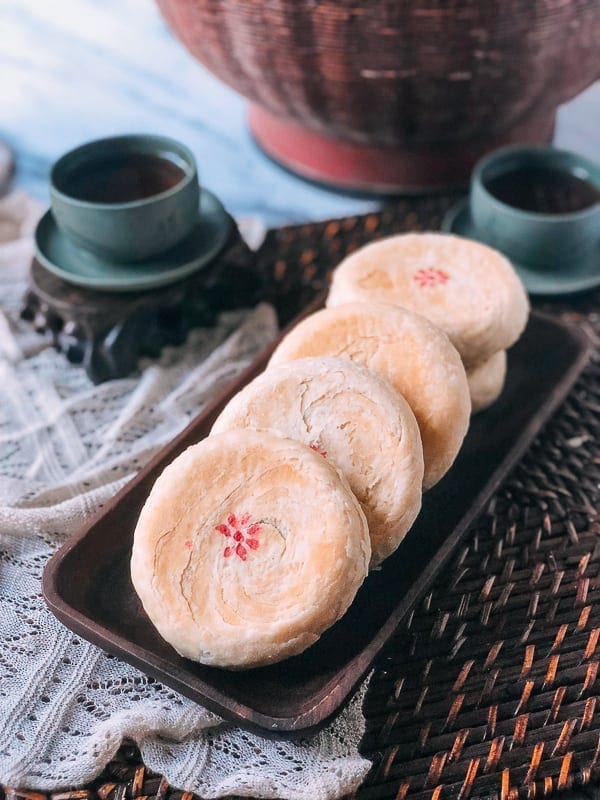
 Place it on a baking sheet lined with parchment paper, seam side down, with at least an inch of space on all sides. Repeat until you’ve made all the mooncakes.
At this point, you can also stamp the mooncakes with a design using 10 drops of red food coloring mixed with ⅛ teaspoon water. Simply dip your stamp (or a star anise pod) into the “ink,” shake off any excess, and stamp the center of the mooncakes).
Place it on a baking sheet lined with parchment paper, seam side down, with at least an inch of space on all sides. Repeat until you’ve made all the mooncakes.
At this point, you can also stamp the mooncakes with a design using 10 drops of red food coloring mixed with ⅛ teaspoon water. Simply dip your stamp (or a star anise pod) into the “ink,” shake off any excess, and stamp the center of the mooncakes).
 Preheat the oven to 375 degrees F, with a rack positioned in the middle of the oven. Bake the mooncakes for 15 minutes. Then carefully flip each mooncake, return to the oven, and bake for another 15 minutes. Cool before handling, and eat them with care, as they’re very flaky and crumbly!

Recipe

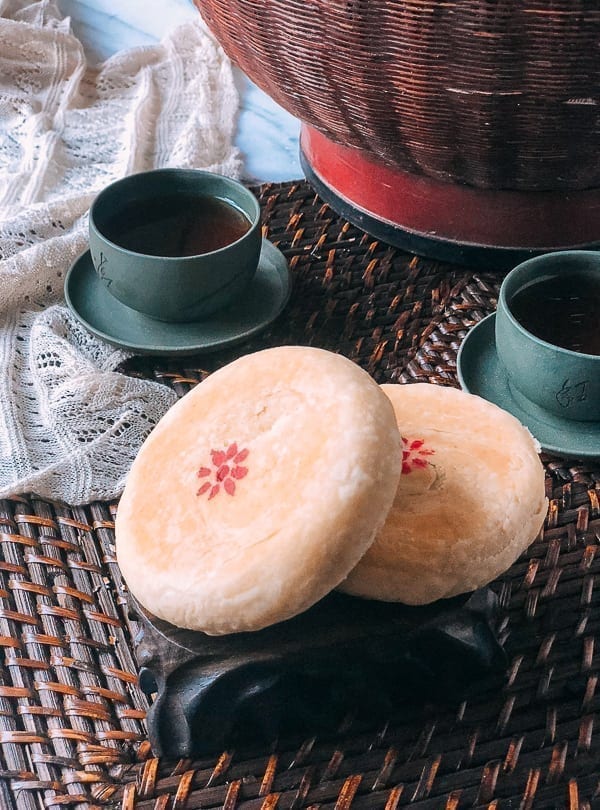
Su-Style Red Bean Mooncakes (苏式月饼)
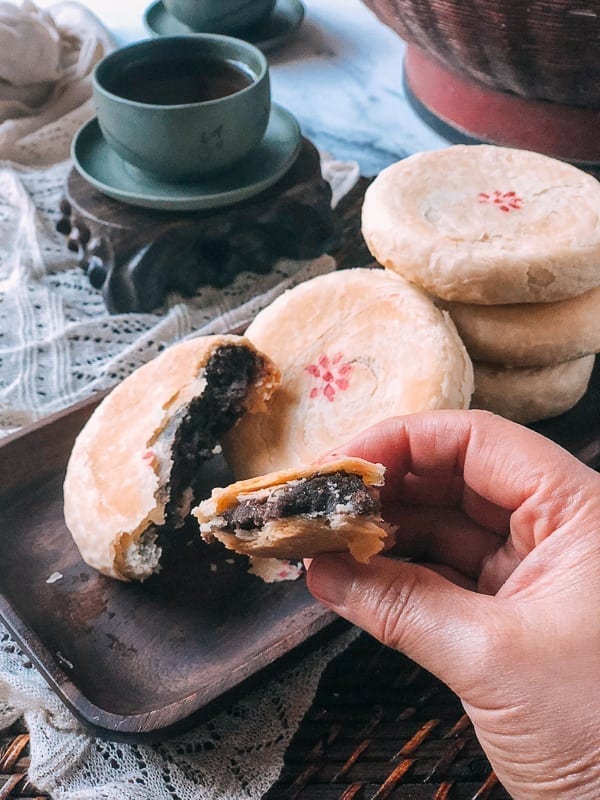
Su-Style Red Bean Mooncakes, are unique to Zhejiang, Suzhou, and Shanghai. Their uniqueness is in the crust––closer to a multi-layered, flaky pastry.
Serves: 24
Ingredients
For the filling:
- 1 recipe sweet red bean paste filling (if you don't have an instant pot to make the recipe, make the red bean paste as outlined in our red bean bread recipe)
For the soft dough:
- 3 cups all-purpose flour (415g)
- 2 tablespoons sugar (20g)
- ¾ cup lard (160g)
- 1 cup lukewarm water (250 ml, about 140 degrees F /60 degrees C)
For the pastry dough:
- 2 cups cake flour (265g)
- ⅔ cup lard (140g)
Instructions
- Start by making the red bean paste. You can either follow our instant pot red bean paste recipe, or our stovetop version.
- Then make the soft dough. In a large mixing bowl, mix together 3 cups of flour and 2 tablespoons sugar. Form a well in the flour, and add ¾ cup of lard. Slowly add 1 cup of lukewarm water in 3-4 batches, mixing with a rubber spatula. Keep folding the lard into the flour with a spatula to form a smooth dough ball. Cover with clear plastic wrap and let it rest in the refrigerator for 30 minutes.
- To make the pastry dough, combine 2 cups of cake flour with ⅔ cup lard. Knead and form the dough ball. Cover with clear plastic wrap, and chill in the fridge for 30 minutes.
- To assemble the mooncakes: after both kinds of dough have chilled for 30 minutes, take them out and weigh each ball. Take the total weight of both balls of dough (we’ll be combining them), and divide it by the number of balls of red bean paste filling that you have (you will have made these balls of filling when following the recipe for the filling). This will give you the amount of dough needed for each mooncake. I needed 55 grams of dough to make 1 mooncake.
- Now transfer the soft dough onto a clean and lightly-floured flat surface. Divide the soft dough as well as the pastry dough into two equal portions, and do the next step in two batches, especially if you don’t have a large surface.
- On a floured surface, press the soft dough into a large disc, and add the pastry dough in the middle. Close all sides to form a large ball. Remember to keep flouring the work surface as needed to prevent it from sticking. With a rolling pin, roll it into a rectangle shape about ¼-inch thick. Then fold the rectangle shape into a tri-fold. Roll it out again into a rectangle shape that’s about ⅛-inch thick. Roll up the sheet on the long-side into a tube and do your best to roll it tight. Now cut the tube into cylinders, each weighing as much as you calculated with the help of a kitchen scale.
- Now take one dough segment and stand it upright so that the swirls are facing up, and press it flat. With a rolling pin, roll the dough into a 4-inch disc (it should be slightly thinner around the outer edges and thicker in the middle). Add a ball of sweet red bean paste filling in the center, then close all the sides until it’s sealed tight and no filling is visible. Put the seam side down, gently flattening the ball into a round disc that’s 1-inch thick. Place it on a baking sheet lined with parchment paper, seam side down, with at least an inch of space on all sides. Repeat until you’ve made all the mooncakes. At this point, you can also stamp the mooncakes with a design using 10 drops of red food coloring mixed with ⅛ teaspoon water. Simply dip your stamp (or a star anise pod) into the “ink,” shake off any excess, and stamp the center of the mooncakes).
- Preheat the oven to 375 degrees F, with a rack positioned in the middle of the oven. Bake the mooncakes for 15 minutes. Then carefully flip each mooncake, return to the oven, and bake for another 15 minutes. Cool before handling, and eat them with care, as they’re very flaky and crumbly!
Nutrition Facts
Calories: 203kcal (10%) Carbohydrates: 46g (15%) Protein: 5g (10%) Fat: 1g (2%) Saturated Fat: 1g (5%) Sodium: 1mg Potassium: 32mg (1%) Fiber: 2g (8%) Sugar: 21g (23%) Vitamin A: 105IU (2%) Vitamin C: 0.7mg (1%) Calcium: 17mg (2%) Iron: 1.4mg (8%)