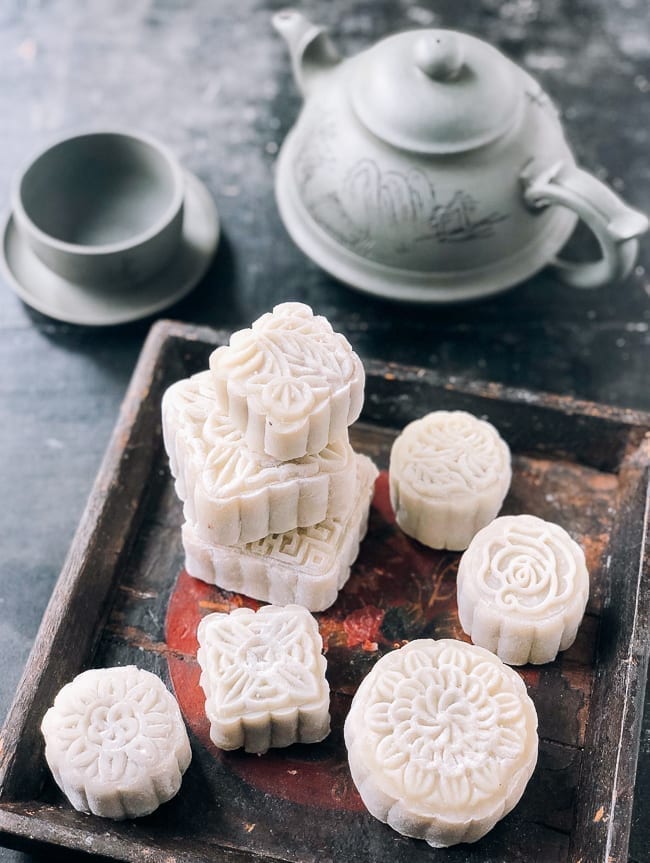
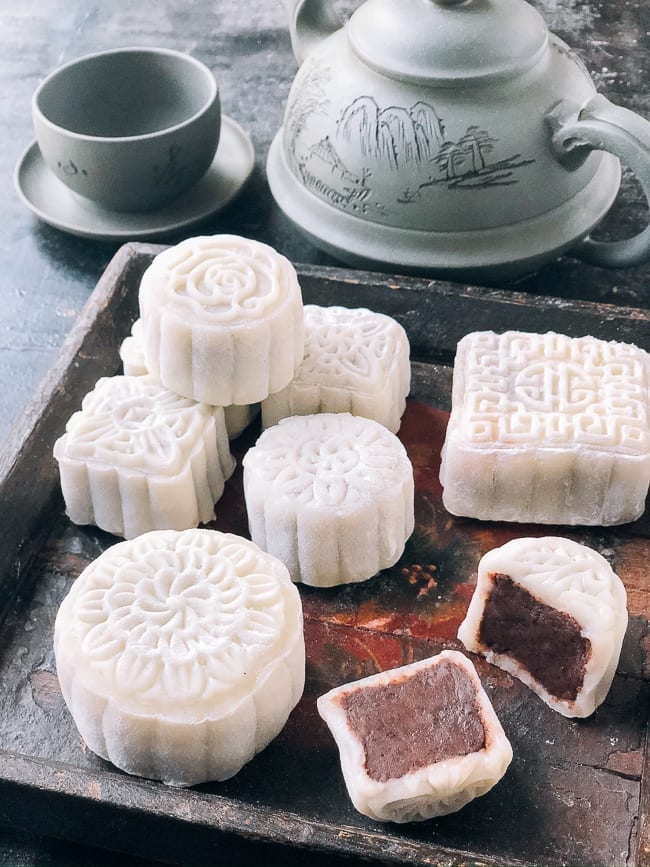
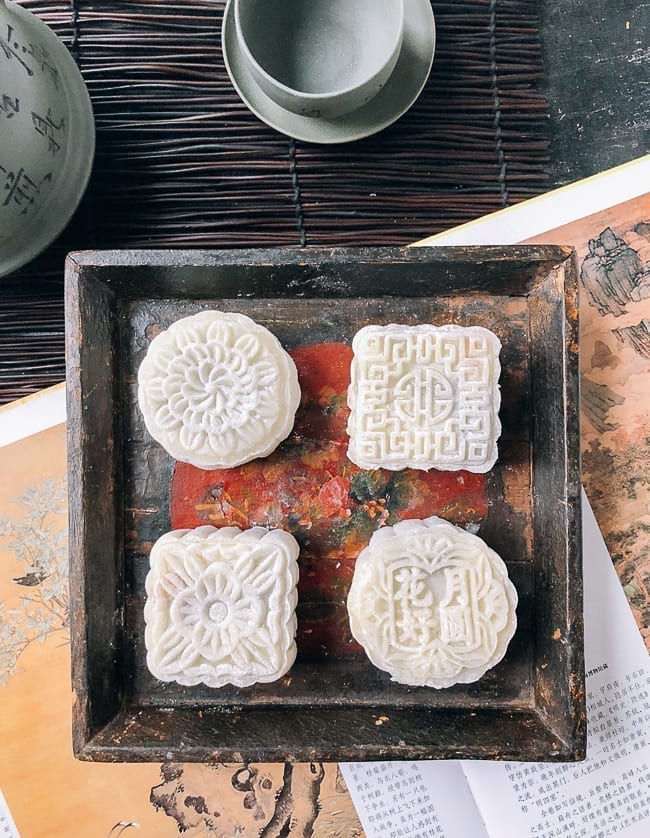
What Are Snow Skin Mooncakes?
In Chinese, the name of these mooncakes is: bīng pí yuèbǐng (冰皮月饼), or literally, “ice/snow skin mooncakes.” They resemble traditional mooncakes in terms of shape, but the innovation is the snowy translucent skin made of mochi! Traditional mooncakes, like our lotus mooncakes with salted egg yolks, involve making a pastry with flour and inverted sugar/golden syrup. This creates a shiny and glossy exterior and soft texture. Snow Skin Mooncakes, on the other hand, aren’t baked at all. They’re made with two types of rice flour (regular and glutinous, a.k.a. sweet rice flour ) and wheat starch. They have a slightly gooey, chewy texture that people across Asia (and the world!) love.Important Differences from Traditional Mooncakes
The differences between snow skin mooncakes and traditional ones have a few pros and cons:Pros:
- No baking required! You do have to steam the dough to cook it, and everything needs to be cooked before assembling. Once you assemble them, though, they’re done!
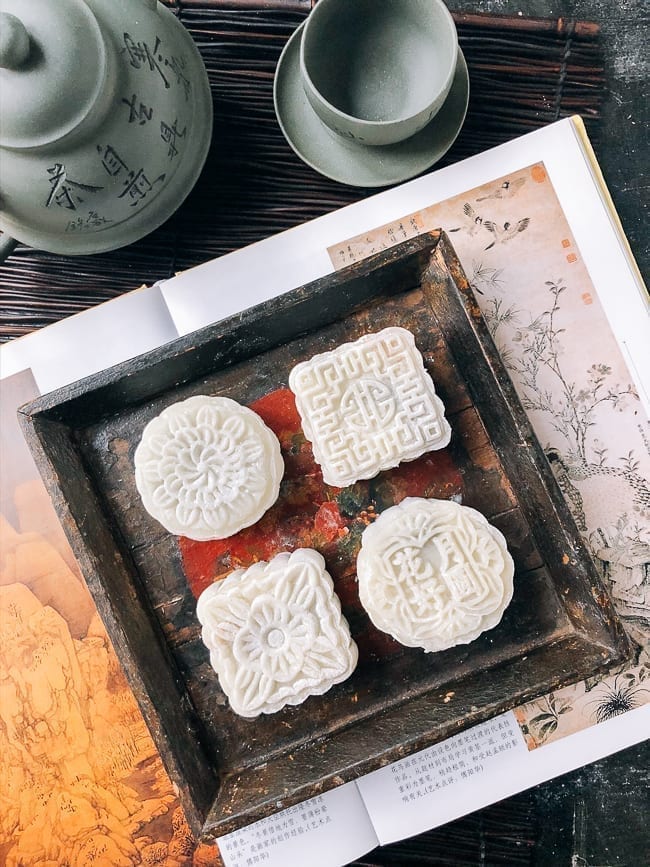
- With food coloring, you can be as creative as you like when it comes to the color of these mooncakes. They don’t have to be white. They can be pink, jade green, or deep purple. You can also use different colored exteriors to differentiate between different flavors.
Cons:
- The shelf life of packaged traditional mooncakes can push 1 year! Homemade mooncakes can stay pretty fresh for up to 2 weeks. However, snow skin mooncakes are best consumed within a few days, with an upper limit of 1 week. The mochi will dry out and crack if left too long.
- Because the outer mochi is so soft, your filling choices are a bit more limited. You need soft pastes like red bean paste, mung bean paste, lotus paste, pumpkin, custard, etc.
- Because the dough is very sticky, you’ll need a pair of food-grade gloves and clear plastic wrap. Sticky rice does not stick to plastic surfaces.
Why Wheat Starch?
The addition of wheat starch ensures that the skin is slightly translucent rather than fully opaque, making the mooncakes look more like ice or snow. Think of har gow (dim sum shrimp dumplings). Wheat starch is the main ingredient in the wrappers for those dumplings, and it’s what makes them translucent enough to see the orange-pink shrimp filling inside. If you can’t find wheat starch, you can substitute cornstarch, a more common ingredient in regular grocery stores. However, the mooncakes will turn out a little more opaque.Filling Recipes & Other Notes
This recipe focuses mainly on how to make the snow skin mooncake “skin,” or outer mochi shell. The recipe yields about 400g of mochi dough. To make the mooncakes, you’ll need a 1:1 ratio of dough to filling. So if you have a 50g mooncake mold (many molds have this measurement), you will need 25g dough and 25g filling. This recipe will make eight 100g mooncakes or sixteen 50g mooncakes. Of course, they don’t all have to be perfect—there’s a 10-15% margin of error here! ;) As you can tell from all my talk of grams, you’re going to need a kitchen scale to make this recipe. Measuring by weight is going to get you much more accurate results!As for the filling, you have a few choices:
- Lotus Seed Paste: Make ⅓ of our Lotus Paste recipe to make enough filling for these mooncakes (you can scale the recipe down by clicking on the number of servings in the recipe card).
- Red Bean Paste: Make ⅓ of our Red Bean Paste recipe to yield about 400g.
- Custard Filling: Use the custard portion of our Custard Bun Recipe (I believe you’ll need the entire recipe).
- Pumpkin Filling: Make the entire filling amount from our Pumpkin Mochi recipe.
Snow Skin Mooncakes: Recipe Instructions
Okay, on to the recipe!To make the mochi dough:
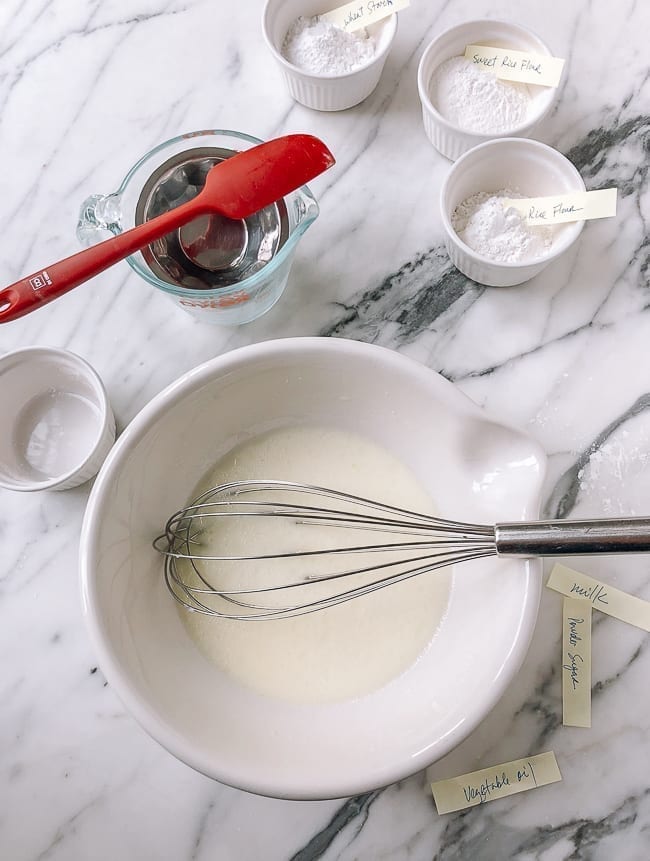
Note: It’s best to prepare your choice of filling a day in advance and keep it refrigerated. See recipe intro for filling suggestions and recipes. I decided to make my red bean paste for these mooncakes, but scroll back up for more filling suggestions and recipes. Gather all your dough ingredients.
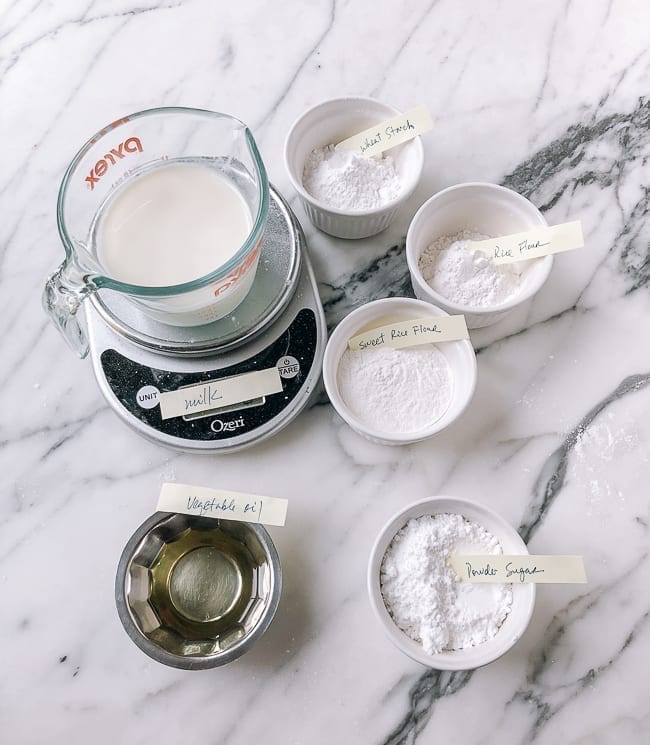 In a large mixing bowl, combine the powdered sugar, milk, and oil.
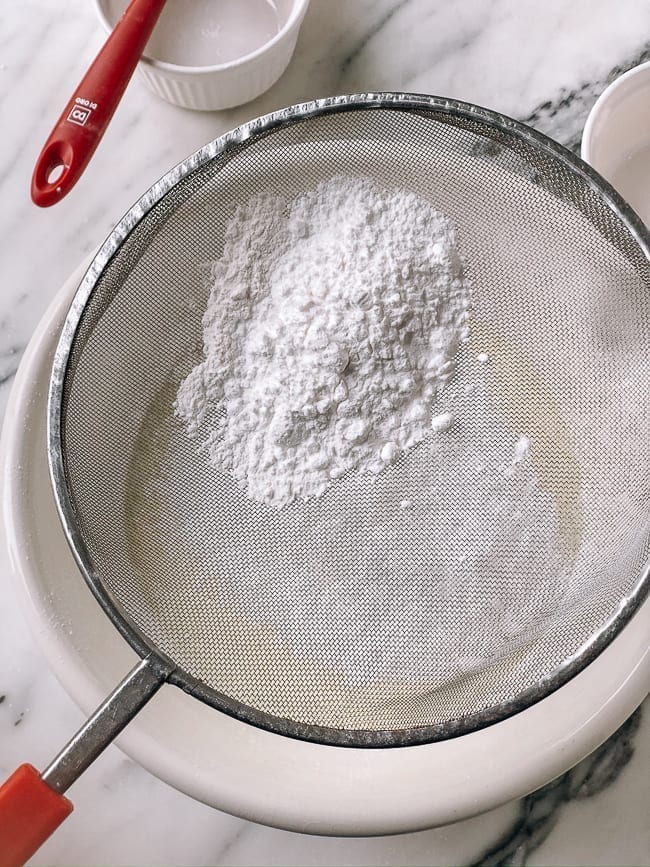
 Sift in 50g glutinous (sweet) rice flour, 35g rice flour, and 35g wheat starch.
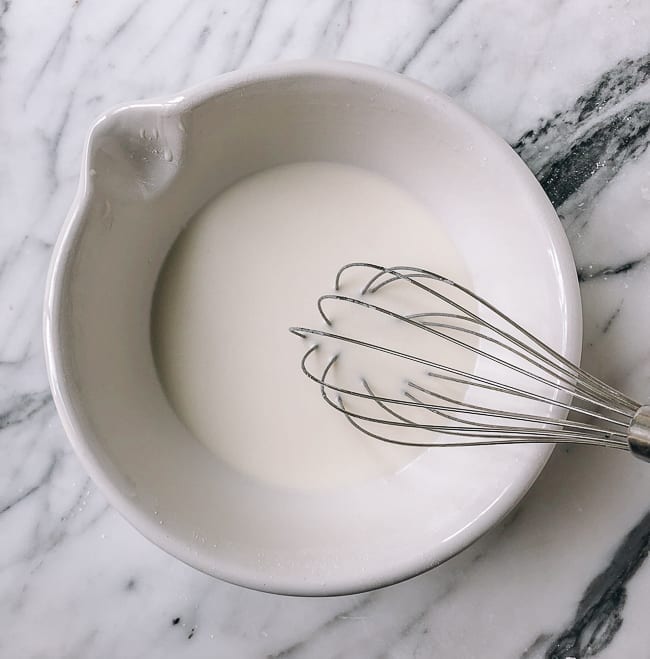
 Stir and mix well until there are no lumps.
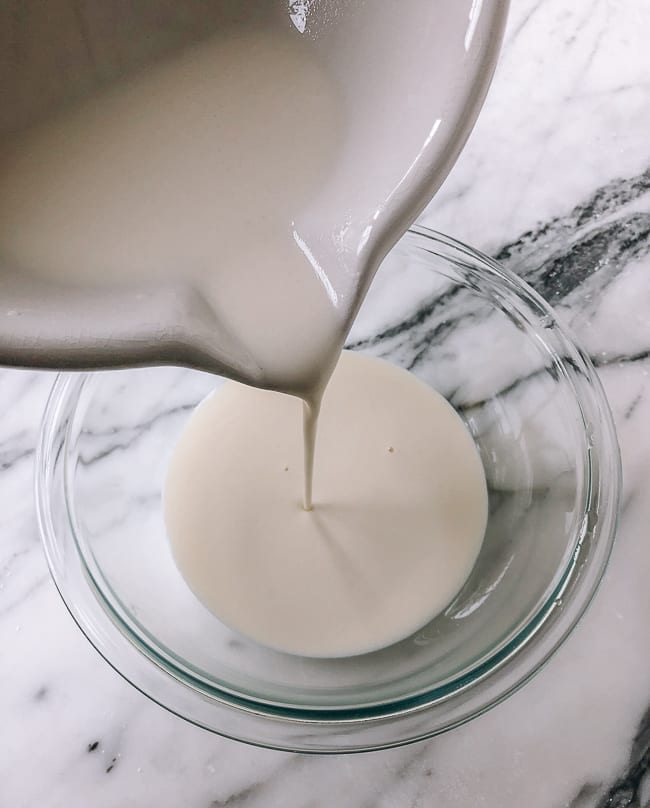
 Pour the dough mixture into a heat-proof bowl that will fit in your steamer. Cover it with clear plastic wrap, and let it rest on the counter for 30 minutes.
 Prepare a steamer by filling it with enough water to steam on high heat for 25 minutes. Place the rested dough (still in the heatproof bowl) into your steamer while the water in the steamer is still cold. Keep the plastic wrap on the dough as it steams to protect it from condensation. Do keep the plastic wrap away from the hot sides of the steamer.
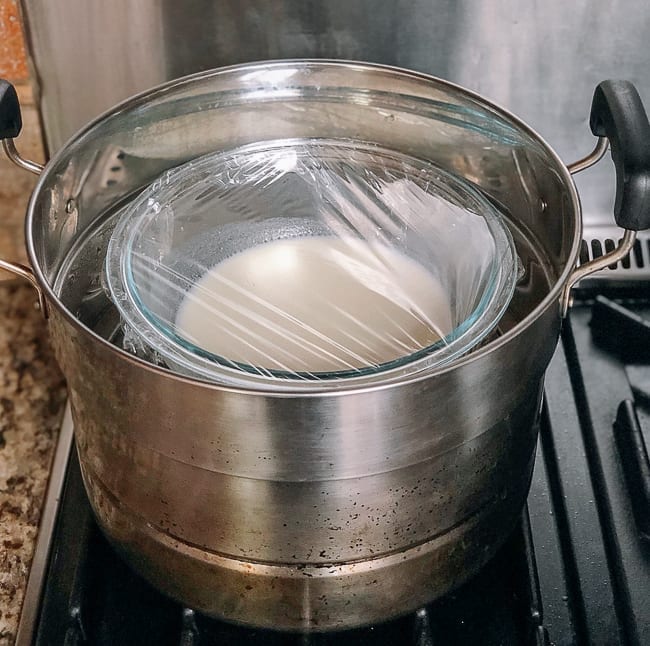 Place the steamer over high heat, cover, and steam for 25 minutes. The dough is cooked once it has turned from fully opaque to fully translucent (a little oil floating to the top is normal). If not, just put the plastic wrap back on and steam for another 5 minutes over high heat.
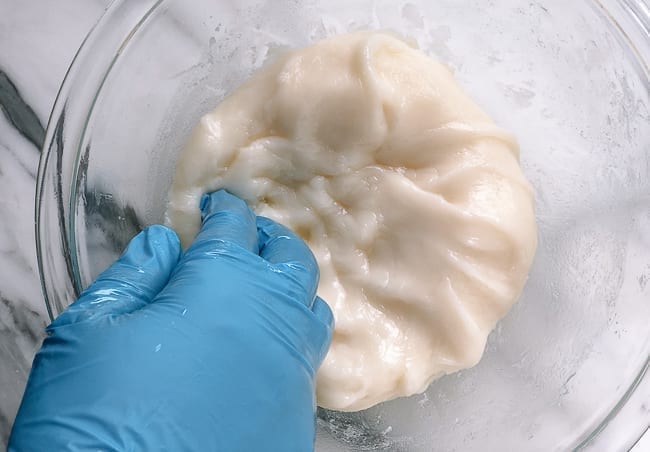
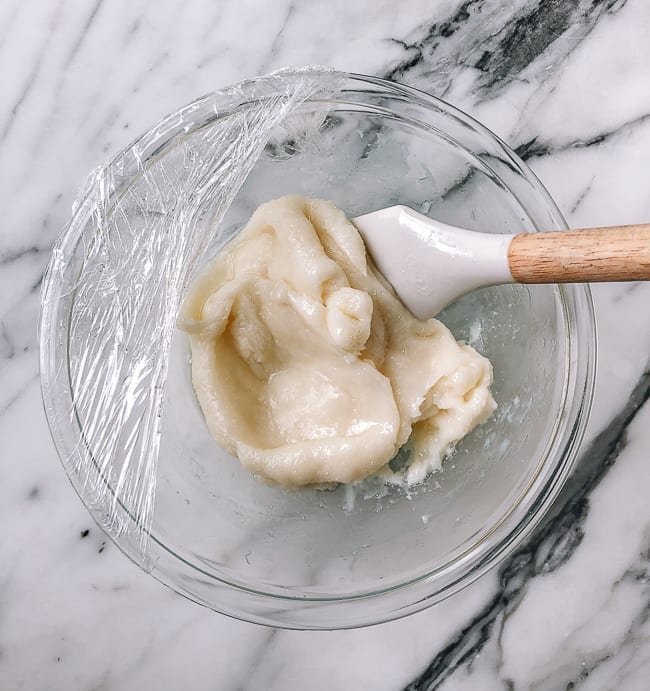 Once the dough is done cooking, carefully stir it to gradually cool it down. Once cool enough to handle, put on your food prep gloves, and knead the dough for a few minutes to ensure the oil is well absorbed and the dough is smooth.
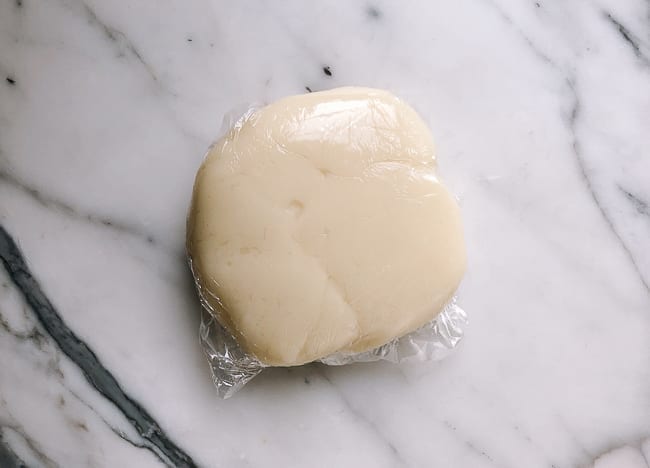
 Wrap the dough in plastic wrap, and chill in the refrigerator for 1-2 hours.
 Cook the remaining 25g glutinous (sweet) rice flour in a clean, dry pan over medium low heat for 6-7 minutes, until it turns very lightly brown. Stir often to avoid burning, and set aside to cool completely. You’ll use this flour for dusting.
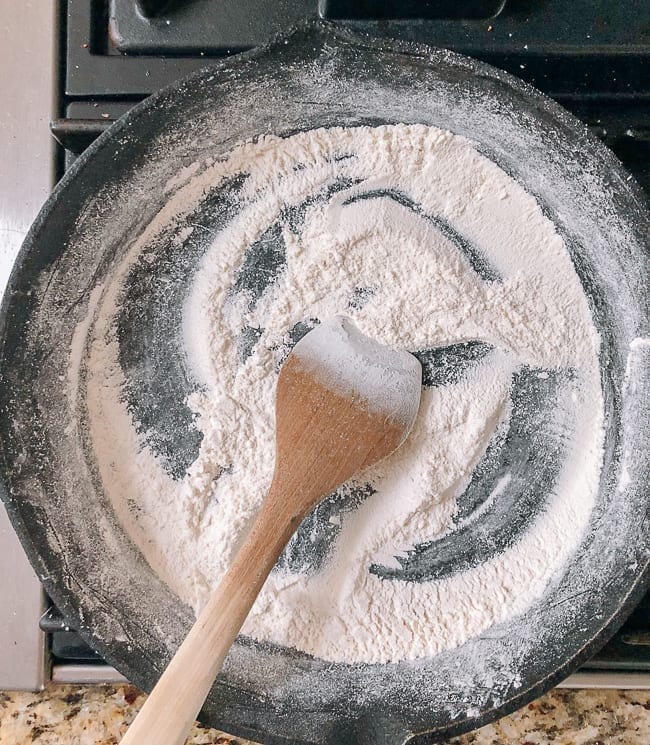 (As you can see from the photos, I initially used a bit too much glutinous (sweet) rice flour in this step. 25g should be sufficient!)
To Assemble:
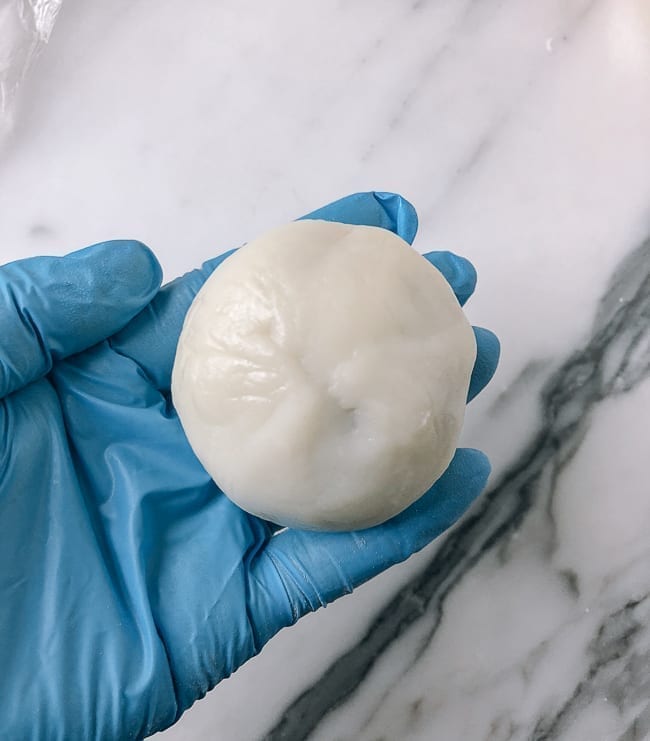
You should have about 400g of dough. The ideal dough to filling ratio is about 1:1. For a 50g mooncake mold, you’ll need 25g dough and 25g filling. Put on your food prep gloves, and weigh/divide the filling into portions that correspond to the size of your mooncake mold. Roll each portion of filling into a ball.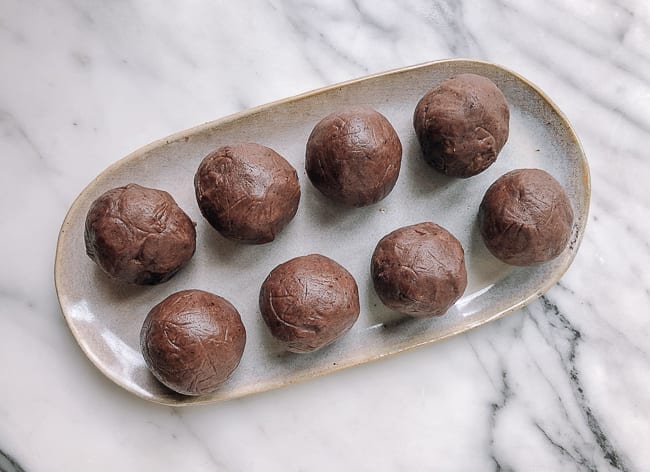 Repeat the same step with the dough after chilling. A plastic dough cutter works well (it doesn’t stick to the dough), or you can just rip the dough apart with your gloved hands. The dough is pliable and very easy to work with.
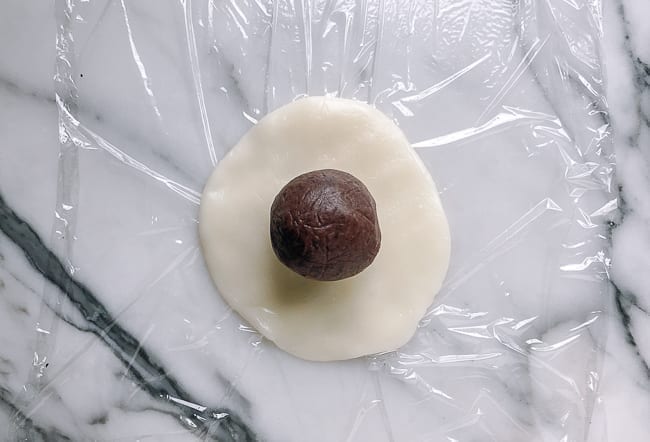
Lay a piece of clear plastic wrap on your work surface to prevent sticking. Take each dough ball, and press it into a round disc with your palm. For a 50g mooncake, the circle should be no bigger than 3 inches (7.5 cm) in diameter. For a 100g mooncake, the skin should be no bigger than 4 inches (10 cm) in diameter. If you’d like to use a rolling pin, the dough must be between two layers of plastic to avoid sticking.
Place a ball of filling in the center of the dough circle.
Repeat the same step with the dough after chilling. A plastic dough cutter works well (it doesn’t stick to the dough), or you can just rip the dough apart with your gloved hands. The dough is pliable and very easy to work with.
Lay a piece of clear plastic wrap on your work surface to prevent sticking. Take each dough ball, and press it into a round disc with your palm. For a 50g mooncake, the circle should be no bigger than 3 inches (7.5 cm) in diameter. For a 100g mooncake, the skin should be no bigger than 4 inches (10 cm) in diameter. If you’d like to use a rolling pin, the dough must be between two layers of plastic to avoid sticking.
Place a ball of filling in the center of the dough circle.
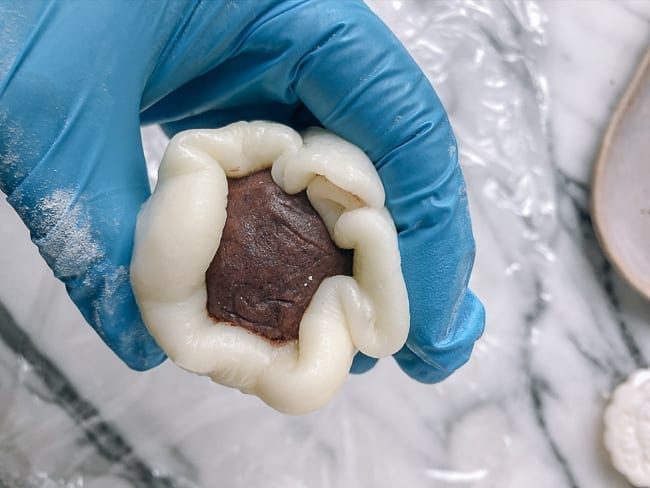
 Carefully lift the whole thing up and turn it upside down. Gently press out the air bubbles around the filling ball.
Turn the opening face up, and slowly press the dough together to close the opening, keeping the dough as even as possible all around.
Carefully lift the whole thing up and turn it upside down. Gently press out the air bubbles around the filling ball.
Turn the opening face up, and slowly press the dough together to close the opening, keeping the dough as even as possible all around.
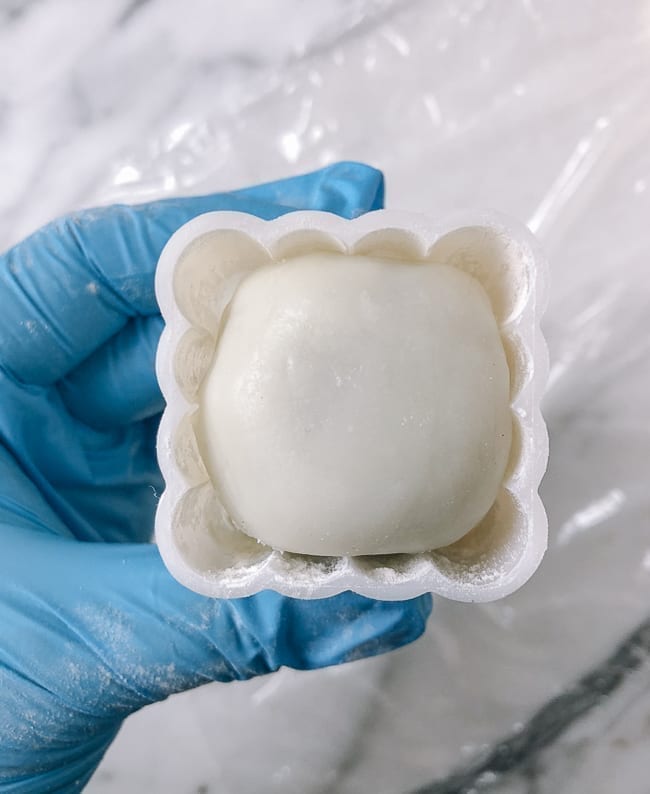
 Dust the inside of the mooncake mold VERY well by brushing all the nooks and crannies with the cooked sweet rice flour. Mooncake molds have intricate designs where dough can get stuck, so it pays to make sure it’s well-floured.
Shake off any excess flour, and carefully place the ball inside the mold. Do not force it in. If necessary, re-shape the mooncake ball so it can easily fit into the mold.
Dust the inside of the mooncake mold VERY well by brushing all the nooks and crannies with the cooked sweet rice flour. Mooncake molds have intricate designs where dough can get stuck, so it pays to make sure it’s well-floured.
Shake off any excess flour, and carefully place the ball inside the mold. Do not force it in. If necessary, re-shape the mooncake ball so it can easily fit into the mold.
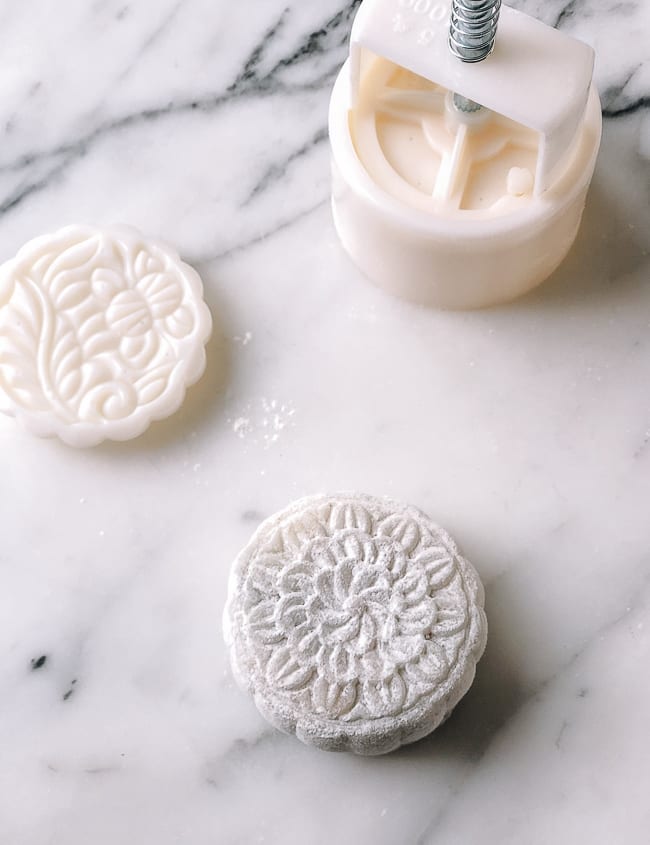
 Flip the mooncake mold so the open side is facing down on the plastic wrap work surface. With slight pressure, gently press down the spring bar on the mold until you feel resistance.
Lift the mold, gently press the spring bar (to push the mooncake out of the mold), and carefully guide (and catch) the mooncake out of the mold with your other hand.
Flip the mooncake mold so the open side is facing down on the plastic wrap work surface. With slight pressure, gently press down the spring bar on the mold until you feel resistance.
Lift the mold, gently press the spring bar (to push the mooncake out of the mold), and carefully guide (and catch) the mooncake out of the mold with your other hand.
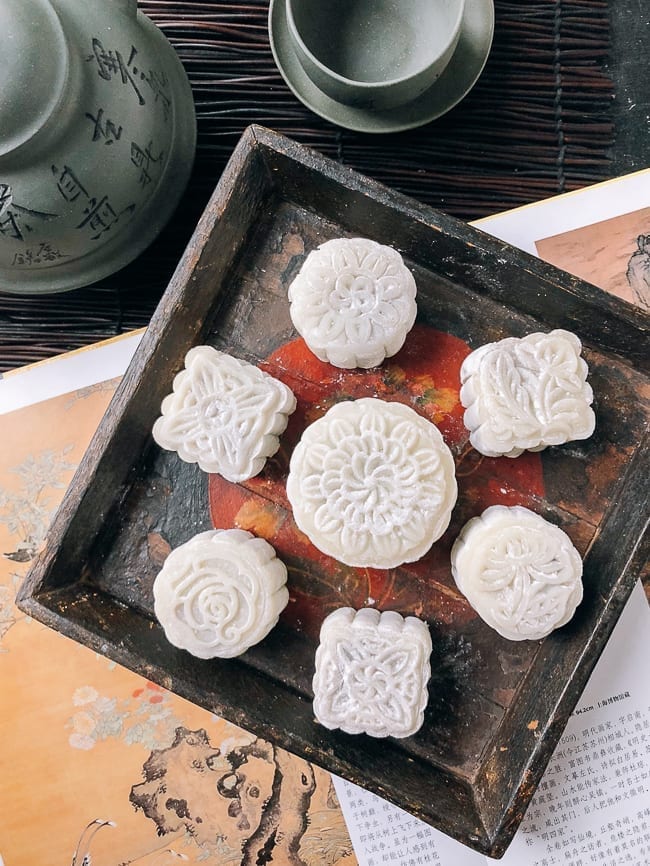
 Continue this process until you’ve assembled all the mooncakes! Chill for a few hours before serving for best taste.
Recipe

Snow Skin Mooncakes
Snow Skin Mooncakes have become very popular. Chewy mochi is wrapped around sweet fillings, as opposed to traditional pastry. Try our recipe!
Serves: 8
Equipment
- Mooncake mold
- Food prep gloves
- Digital kitchen scale
- Plastic wrap
- Pastry brush
Ingredients
- 400 g filling of your choice (we used red bean paste)
- 60 g powdered sugar
- 215 g whole milk
- 25 g vegetable oil
- 50 g glutinous (sweet) rice flour (plus 25g, divided)
- 35 g rice flour
- 35 g wheat starch
Instructions
- Note: It’s best to prepare your choice of filling a day in advance and keep it refrigerated.
To make dough:
- In a large mixing bowl, combine the powdered sugar, milk, and oil. Sift in 50g glutinous (sweet) rice flour, 35g rice flour, and 35g wheat starch. Stir and mix well until there are no lumps.
- Pour the dough mixture into a heat-proof bowl that will fit in your steamer. Cover it with clear plastic wrap, and let it rest on the counter for 30 minutes.
- Prepare a steamer by filling it with enough water to steam on high heat for 25 minutes. Place the rested dough (still in the heatproof bowl) into your steamer while the water in the steamer is still cold. Keep the plastic wrap on the dough as it steams to protect it from condensation. Do keep the plastic wrap away from the hot sides of the steamer.
- Place the steamer over high heat, cover, and steam for 25 minutes. The dough is cooked once it has turned from fully opaque to fully translucent. A little oil floating to the top is normal. If the dough is not completely cooked through, just put the plastic wrap back on and steam for another 5 minutes over high heat.
- Once the dough is done cooking, carefully stir it to gradually cool it down. Once cool enough to handle, put on your food prep gloves, and knead the dough for a few minutes to ensure the oil is well absorbed and the dough is smooth. Wrap the dough in plastic wrap, and chill in the refrigerator for 1-2 hours.
- Cook the remaining 25g glutinous (sweet) rice flour in a clean, dry pan over medium low heat for 6-7 minutes, until it turns very lightly brown. Stir often to avoid burning, and set aside to cool completely. You’ll use this flour for dusting.
To assemble:
- You should have about 400g of dough. The ideal dough to filling ratio is about 1:1. For a 50g mooncake mold, you’ll need 25g dough and 25g filling. Put on your food prep gloves, and weigh/divide the filling into portions that correspond to the size of your mooncake mold. Roll each portion of filling into a ball. Repeat the same step with the dough after chilling. A plastic dough cutter works well (it doesn’t stick to the dough), or you can just rip the dough apart with your gloved hands. The dough should be pliable and very easy to work with.
- Lay a piece of clear plastic wrap on your work surface to prevent sticking. Take each dough ball, and press it into a round disc with your palm. For a 50g mooncake, the circle should be no bigger than 3 inches (7.5 cm) in diameter. For a 100g mooncake, the skin should be no bigger than 4 inches (10 cm) in diameter. If you’d like to use a rolling pin, the dough must be between two layers of plastic wrap to avoid sticking.
- Place a ball of filling in the center of the dough circle, and carefully lift the whole thing up and turn it upside down. Gently press out the air bubbles around the filling ball.
- Turn the opening face up, and slowly press the dough together to close the opening, keeping the dough as even as possible all around.
- Dust the inside of the mooncake mold VERY well by brushing all the nooks and crannies with the cooked glutinous rice flour (AKA sweet rice flour). Mooncake molds have intricate designs where dough can get stuck, so it pays to make sure it’s well-floured. Shake off any excess flour, and carefully place the ball inside the mold. Do not force it in. If necessary, re-shape the mooncake ball so it can easily fit into the mold.
- Flip the mooncake mold so the open side is facing down on the plastic wrap work surface. With slight pressure, gently press down the spring bar on the mold until you feel resistance. Lift the mold, gently press the spring bar (to push the mooncake out of the mold), and carefully guide (and catch) the mooncake out of the mold with your other hand. Continue this process until all the mooncakes are assembled.
Tips & Notes:
- It’s best to prepare your choice of filling a day in advance and keep it refrigerated. See post for filling suggestions and recipes. Nutrition information is calculated based on a filling of red bean paste.
- Recipe makes eight 100g mooncakes or sixteen 50g mooncakes.
- Total recipe time does not include time to make filling.
- Store in an airtight container, lined with clear plastic wrap to prevent sticking. Chilling them in the refrigerator for a few hours before serving is best—the mochi will be nice and chewy!
- Eat these within 3-4 days for best taste, or within 1 week at most.
- For extra insurance against the mooncakes sticking to the inside of the mold, you dust the dough ball in addition to the mold itself with the cooked sweet rice flour (AKA glutinous rice flour) before inserting it into the mold. This will make the process easier, but too much rice flour can affect the clean look of the finished product. As you can see from my mooncakes, some areas have just a bit too much flour.
Nutrition Facts
Calories: 264kcal (13%) Carbohydrates: 52g (17%) Protein: 4g (8%) Fat: 4g (6%) Saturated Fat: 3g (15%) Cholesterol: 3mg (1%) Sodium: 12mg (1%) Potassium: 40mg (1%) Fiber: 2g (8%) Sugar: 32g (36%) Vitamin A: 44IU (1%) Calcium: 40mg (4%) Iron: 1mg (6%)